Audi Q3: Left/Right Front Turn Signal Bulb -M5- / -M7-, Removing and Installing
Left/Right Front Turn Signal Bulb -M5-/-M7-, Removing and Installing, Halogen Headlamps
Removing
- Remove the headlamp housing. Refer to → Chapter "Headlamp, Removing and Installing, Halogen Headlamps".
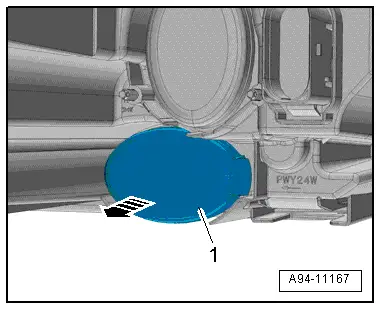
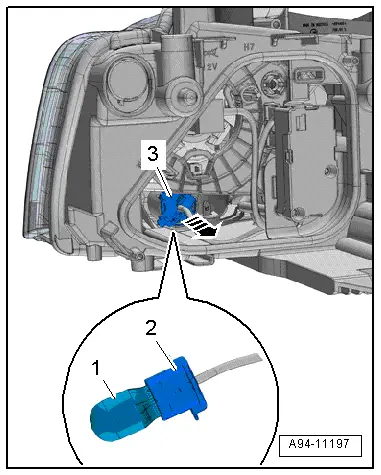
- Remove the turn signal housing cover -1- from the headlamp housing in direction of -arrow-.
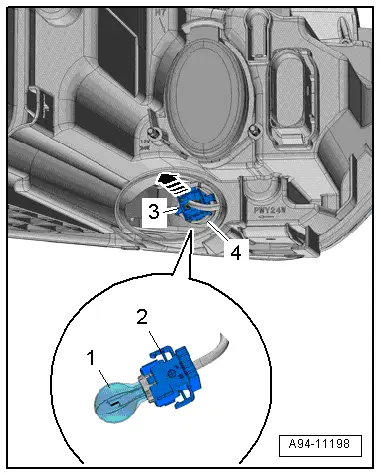
- Remove the bulb socket -3- from the housing -4- in direction of -arrow-.
- Remove bulb -1- from socket -2-.
Installing
Install in reverse order of removal. Note the following:
- Insert the new bulb in the socket. Do not touch the glass bulbs with bare hands.
- Close the housing cover while doing this the tab must point to the center of the vehicle.
- Install the headlamp housing. Refer to → Chapter "Headlamp, Removing and Installing, Halogen Headlamps".
Left/Right Front Turn Signal Bulb -M5-/-M7-, Removing and Installing, HID Headlamps, through MY 2014
Removing
- Turn the light switch to position "0".
- Turn off the ignition and all electrical consumers and remove the ignition key.
- Do not press the flasher.
- Remove the turn signal housing cover -1- from the headlamp housing in direction of -arrow-.
- Remove the bulb socket -3- from the housing -4-.
- Remove bulb -1- from socket -2-.
Installing
Install in reverse order of removal. Note the following:
- Insert the new bulb in the socket. Do not touch the glass bulbs with bare hands.
- Close the housing cover while doing this the tab must point to the center of the vehicle.

Left/Right Front Turn Signal Bulb -M5-/-M7-, Removing and Installing, HID Headlamps, from MY 2015
Removing
- Turn the light switch to position "0".
- Turn off the ignition and all electrical equipment and remove the ignition key.
- Do not operate the flasher.
- If equipped, remove the left air filter housing. Refer to → Rep. Gr.23; Air Filter; Air Filter Housing, Removing and Installing or → Rep. Gr.24; Air Filter; Air Filter Housing, Removing and Installing.
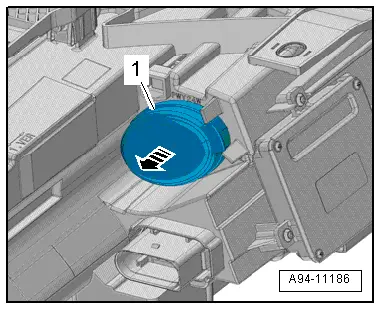
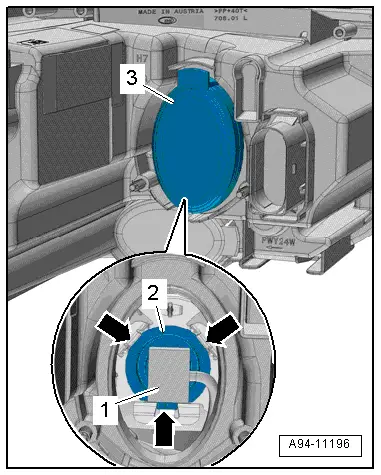
- Turn the housing cover -1- counter-clockwise -arrow- and remove it from the headlamp housing.

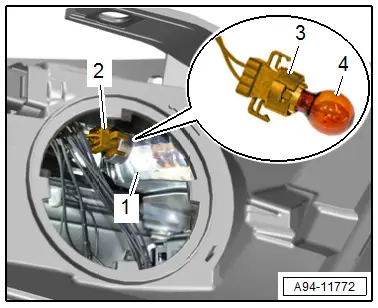
- Remove the bulb socket -2- from the housing -1-.
- Remove the bulb -4- from the bulb socket -3-.
Installing
Install in reverse order of removal, while paying attention to the following:
- Insert the new bulb in the socket. Do not touch the glass bulbs with bare hands.
- Close the housing cover clockwise.
Left/Right Position Lamp Bulb -M1-/-M3-, Removing and Installing
 Note
Note
The left and right position lamp bulb -M1-/-M3- and the left and right daytime running lamp bulb -L174-/-L175- are one component.
Removing
- Remove the headlamp housing. Refer to → Chapter "Headlamp, Removing and Installing, Halogen Headlamps".
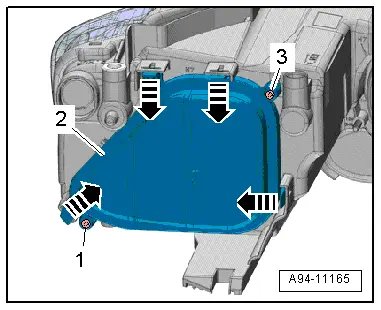
- If equipped, remove the bolts -1 and 3-.
- Open the tabs in direction of -arrows- and remove the housing cover -2-.
- Remove the bulb socket -3- from the housing -arrow-.

- Remove bulb -1- from socket -2-.
Installing
Install in reverse order of removal. Note the following:
- Insert the new bulb in the socket. Do not touch the glass bulbs with bare hands.
- Close the housing cover and secure with the bolts clips.
- Install the headlamp housing. Refer to → Chapter "Headlamp, Removing and Installing, Halogen Headlamps".
Low Beam Headlamp Bulb, Removing and Installing
Removing
- Remove the headlamp housing. Refer to → Chapter "Headlamp, Removing and Installing, Halogen Headlamps".
- If equipped, remove the bolts -1 and 3-.
- Open the tabs in direction of -arrows- and remove the housing cover -2-.
- Remove the bulb -1- from the spring clips -arrows-.
- Disconnect the connector -2- from the bulb.
Installing
Install in reverse order of removal. Note the following:
- Push the new bulb past the resistance of the spring clips into the housing and connect the connector. This way the glass bulb is not touched with bare hands.
- Close the housing cover and secure with the bolts clips.
- Install the headlamp housing. Refer to → Chapter "Headlamp, Removing and Installing, Halogen Headlamps".
Left/Right High Beam Headlamp Bulb -M30-/-M32-, Removing and Installing
Removing
- Turn the light switch to position "0".
- Turn off the ignition and all electrical consumers and remove the ignition key.
- Do not press the flasher.
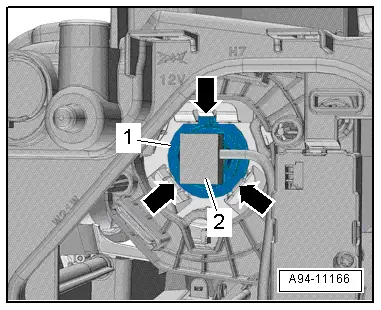
- Remove the high beam headlamp housing cover -3- from the housing.
- Remove the bulb -2- from the spring clips -arrows-.
- Disconnect the connector -1- from the bulb.
Installing
Install in reverse order of removal. Note the following:
- Push the new bulb past the resistance of the spring clips into the housing and connect the connector. This way the glass bulb is not touched with bare hands.
- Close the housing cover while doing this the tab must point upward.
READ NEXT:
 Left/Right HID Headlamp Bulb -L13-/-L14-, Removing and Installing
Left/Right HID Headlamp Bulb -L13-/-L14-, Removing and Installing,
through MY 2014
WARNING
High voltage poses a life-endangering risk, injury
risk and environmental hazard.
HID headla
Left/Right HID Headlamp Control Module -J343-/-J344-, Removing and
Installing
Left/Right HID Headlamp Control Module -J343-/-J344-, Removing and
Installing, through MY 2014
Removing
- Remove the headlamp housing. Refer to
→ Chapter "Headlamp, Removing and Inst
Left/Right Headlamp Beam Adjustment Motor -V48-/-V49-, Removing and
Installing
Left/Right Headlamp Beam Adjustment Motor -V48-/-V49-, Removing and
Installing, Halogen Headlamps
Removing
- Remove the headlamp housing. Refer to
→ Chapter "Headlamp, Removing and I
SEE MORE:
Headlamp, Adjusting
Headlamp, Adjusting
The following test and adjustment description applies to all
countries.
However, national guidelines or regulations of the country
should be observed.
Halogen Headlamp, Adjusting
Checking and Adjusting Conditions
Tire pressure is OK.
The headlamp lens must be
Operating in the cockpit
Fig. 78 Deluxe automatic climate control with 2 zones/3 zones: controls
Observe the safety precautions.
The functions can be switched on and off by
pressing the buttons or adjusted by turning the
knob. When the function is switched on, the LED
in the respective button or knob turns on.
Cooling mod
