Audi Q3: Left/Right HID Headlamp Control Module -J343-/-J344-, Removing and Installing
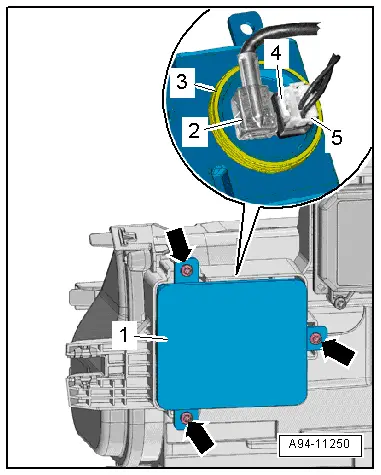
Left/Right HID Headlamp Control Module -J343-/-J344-, Removing and Installing, through MY 2014
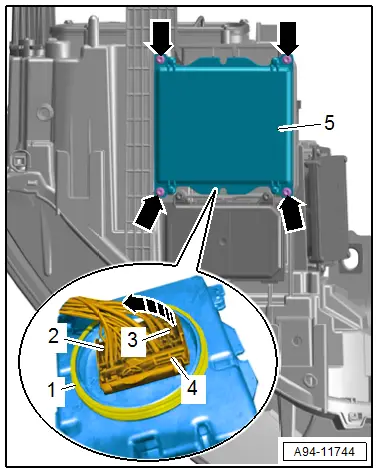
Removing
- Remove the headlamp housing. Refer to → Chapter "Headlamp, Removing and Installing, HID and LED Headlamps".
- Remove the bolts -arrows-.
- Remove the control module -1- from the headlamp housing.
- Disconnect the adapter cable -2- by pushing the securing tab if equipped.
- Disconnect the connector -5- by pushing the securing tab -4-.
- Remove the control module.
Installing
Install in reverse order of removal, while paying attention to the following:
- Check the seal -3- between the control module and the headlamp housing for damage.
- Install the headlamp housing. Refer to → Chapter "Headlamp, Removing and Installing, HID and LED Headlamps".
Left/Right HID Headlamp Control Module -J343-/-J344-, Removing and Installing, from MY 2015
 Note
Note
The Left/Right HID headlamp bulbs -L13-/-L14- is integrated in the Left/Right HID Headlamp Control Module -J343-/-J344-. The control module cannot be replaced separately if it is faulty. Remove the HID headlamp bulb. Refer to → Chapter "Left/Right HID Headlamp Bulb -L13-/-L14- with Left/Right HID Headlamp Control Module -J343-/-J344-, Removing and Installing, from MY 2015".
Left/Right Headlamp Power Output Stage -J667-/-J668-, Removing and Installing
Left/Right Headlamp Power Output Stage -J667-/-J668-, Removing and Installing, through MY 2014
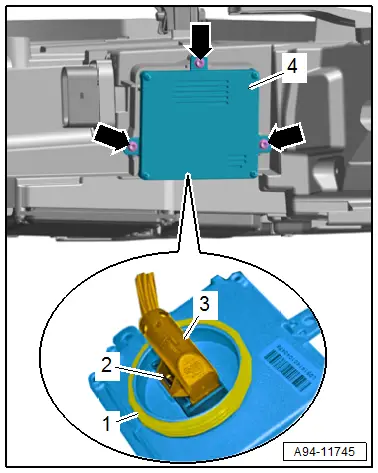
Removing
- Remove the headlamp housing. Refer to → Chapter "Headlamp, Removing and Installing, HID and LED Headlamps".
- Remove the bolts -arrows-.
- Remove the control module -1- from the headlamp housing.
Installing
Install in reverse order of removal, while paying attention to the following:
- Check the seal -2- between the control module and the headlamp housing for damage.

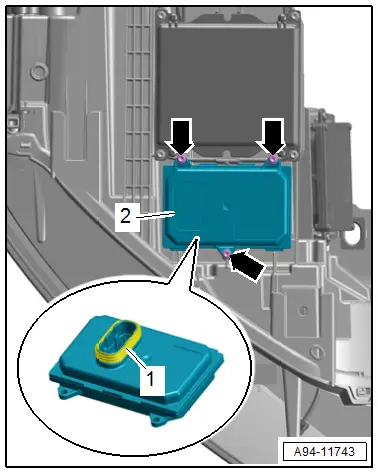
Left/Right Headlamp Power Output Stage -J667-/-J668-, Removing and Installing, from MY 2015
Removing
- Remove the headlamp housing. Refer to → Chapter "Headlamp, Removing and Installing, HID and LED Headlamps".
- Remove the bolts -arrows-.
- Remove the control module -2- from the headlamp housing.
Installing
Install in reverse order of removal, while paying attention to the following:
- Check the seal -1- between the control module and the headlamp housing for damage.
Left/Right Daytime Running Lamp and Position Lamp Control Module -J860-/-J861-, Removing and Installing
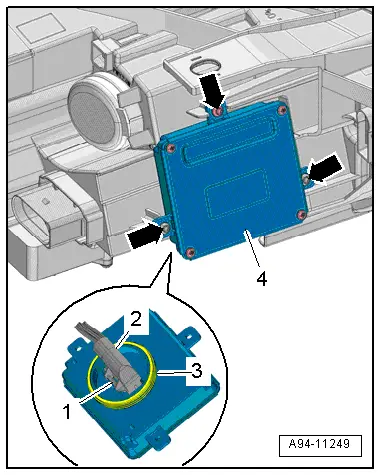
Left/Right Daytime Running Lamp and Position Lamp Control Module -J860-/-J861-, Removing and Installing, through MY 2014
Removing
- Remove the headlamp housing. Refer to → Chapter "Headlamp, Removing and Installing, HID and LED Headlamps".
- Remove the bolts -arrows-.
- Remove the control module -4- from the headlamp housing.
- Press the release button -1- and disconnect the connector -2-.
- Remove the control module.
Installing
Install in reverse order of removal, while paying attention to the following:
- Check the seal -3- between the control module and the headlamp housing for damage.
Left/Right Daytime Running Lamp and Position Lamp Control Module -J860-/-J861-, Removing and Installing, from MY 2015
Removing
- Remove the headlamp housing. Refer to → Chapter "Headlamp, Removing and Installing, HID and LED Headlamps".
- Remove the bolts -arrows-.
- Remove the control module -1- from the headlamp housing.
- Press the release button -2- and disconnect the connector -3-.
- Remove the control module.
Installing
Install in reverse order of removal, while paying attention to the following:
- Check the seal -4- for damage.
Headlamp Power Output Stage, Removing and Installing
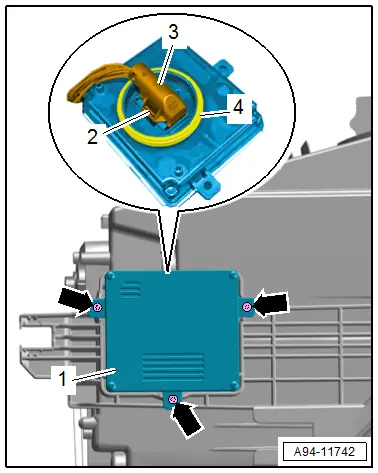
Right/Left LED Headlamp Power Output Module 1 -A27-/-A31-, Removing and Installing
Removing
- Remove the headlamp housing. Refer to → Chapter "Headlamp, Removing and Installing, HID and LED Headlamps".
- Remove the bolts -arrows-.
- Remove the power output stage -5-.
- Disconnect the connector -2-.
- To disconnect the connector, press the tab -3-, turn the retaining bracket -4- in direction of the -arrow- and remove the connector.
Installing
Install in reverse order of removal, while paying attention to the following:
- Check the seal -1- for damage.
Right/Left LED Headlamp Power Output Module 2 -A28-/-A32-, Removing and Installing
Removing
- If equipped, remove the left air filter housing. Refer to → Rep. Gr.23; Air Filter; Air Filter Housing, Removing and Installing or → Rep. Gr.24; Air Filter; Air Filter Housing, Removing and Installing.
- Vehicles with TDI engine: Loosen fuel filter on and set aside with the lines connected. Refer to → Fuel Supply System; Rep. Gr.20; Fuel Filter; Fuel Filter, Removing and Installing.
- Remove the bolts -arrows-.
- Remove the power output stage -4-.
- Press the release button -2- and disconnect the connector -3-.
- Remove the power output stage.
Installing
Install in reverse order of removal, while paying attention to the following:
- Check the seal -1- for damage.
READ NEXT:
 Left/Right Headlamp Beam Adjustment Motor -V48-/-V49-, Removing and
Installing
Left/Right Headlamp Beam Adjustment Motor -V48-/-V49-, Removing and
Installing
Left/Right Headlamp Beam Adjustment Motor -V48-/-V49-, Removing and
Installing, Halogen Headlamps
Removing
- Remove the headlamp housing. Refer to
→ Chapter "Headlamp, Removing and I
Fog Lamp
Overview - Fog Lamps
1 - Air Intake Grille
2 - Fog Lamp
Removing and installing. Refer to
→ Chapter "Fog Lamp, Removing and Installing".
3 - Bolt
Side Marker Lamp
Overview - Side Marker Lamp
1 - Front Bumper Cover
2 - Rear Side Marker Lamp Bulb
The entire body tail lamp must be replaced if an LED is faulty
Left Rear Side Marker Lam
SEE MORE:
Center Console, Removing and Installing
Center Console, Removing and Installing
Removing
- Remove the center console insert. Refer to
→ Chapter "Center Console Insert, Removing and Installing".
- Versions with Access/Start Authorization Button -E408-:
Remove the front storage compartment. Refer to
→ Chapter
Lock Cylinder, Removing and Installing
Create an assisting tool from a wire hook as follows:
- Take a 1.5 mm diameter welding wire and bend the end to form
an eye.
- Then cut the welding wire.
Dimension -a- = approximately
50 mm.
- File the end of the wire hook into a point.
Dimension -b- = 3 mm
