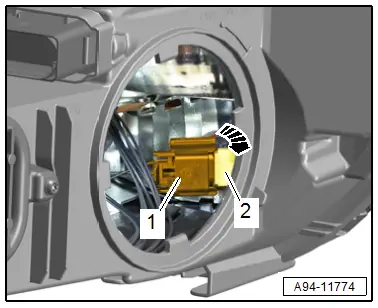
Audi Q3: Left/Right HID Headlamp Bulb -L13-/-L14-, Removing and Installing
Left/Right HID Headlamp Bulb -L13-/-L14-, Removing and Installing, through MY 2014
 WARNING
High voltage poses a life-endangering risk, injury risk and environmental hazard.
HID headlamp usage and safety precautions. Refer to → Chapter "HID Headlamp Usage and Safety Precautions".
Removing
- Remove the headlamp housing. Refer to → Chapter "Headlamp, Removing and Installing, HID and LED Headlamps".
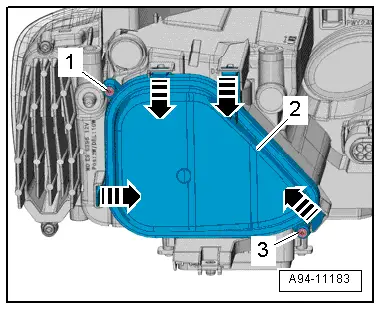
- If equipped, remove the bolts -1 and 3-.
- Open the tabs -arrows- and remove the housing cover -2-.
Version 1:
- Disengage the spring clip -2- and pivot toward the rear out from the housing -arrow-.
- The clip -1- is loosened by pivoting out the spring clip.
- Disconnect the connector -3-.
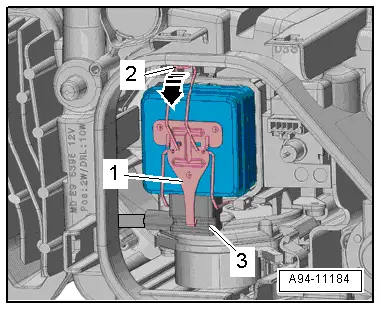
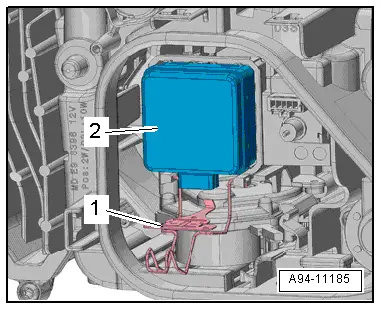
- Fold the spring clip -1- down and remove the HID headlamp bulb -2- from the housing.
Version 2:
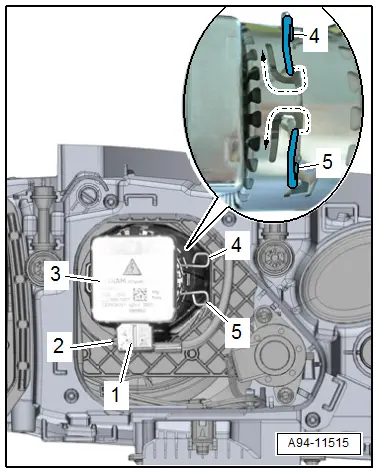
- Press the tab -1- and disconnect the connector -2-.
- Disengage the spring clips -4 and 5--arrows-.
- Remove the HID headlamp bulb -3- from the housing.
Installing
Install in reverse order of removal, while paying attention to the following:
- Insert the new HID headlamp bulb in the housing. Do not touch the glass bulbs with bare hands.
- Installation position: the electrical connection faces down.
- Connect the connector and secure the HID headlamp bulb with the spring clip.
- Close the housing cover and secure with the bolts.
- Install the headlamp housing. Refer to → Chapter "Headlamp, Removing and Installing, HID and LED Headlamps".
Left/Right HID Headlamp Bulb -L13-/-L14- with Left/Right HID Headlamp Control Module -J343-/-J344-, Removing and Installing, from MY 2015
 WARNING
High voltage poses a life-endangering risk, injury risk and environmental hazard.
HID headlamp usage and safety precautions. Refer to → Chapter "HID Headlamp Usage and Safety Precautions".
Removing
- Remove the headlamp housing. Refer to → Chapter "Headlamp, Removing and Installing, HID and LED Headlamps".
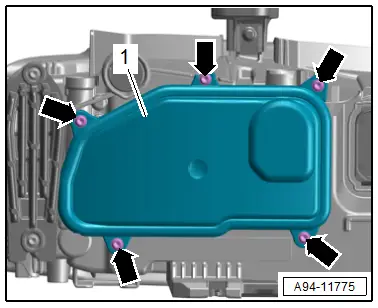
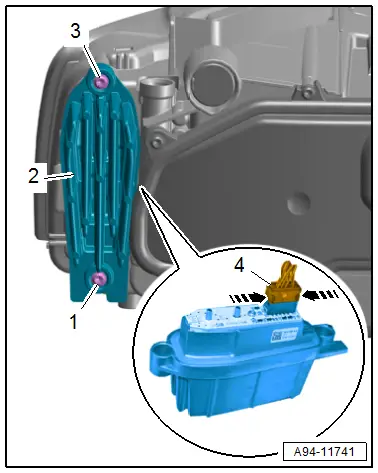
- Remove the bolts -arrows-.
- Remove the housing cover -1- from the headlamp housing.
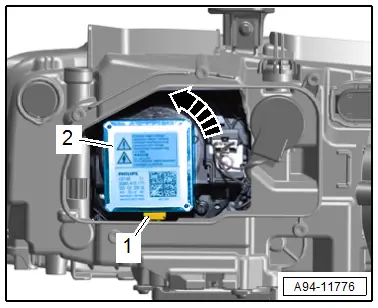
- Turn the HID bulb -2- counter-clockwise -arrow- and remove it from the housing.
- Disconnect the connector -1-.
Installing
Install in reverse order of removal, while paying attention to the following:
- Insert the new HID headlamp bulb in the housing. Do not touch the glass bulbs with bare hands.
- Installation position: the electrical connection faces down.
- Close the housing cover and tighten the bolts.
Left/Right Daytime Running Lamp and Position Lamp LED Module -L176-/-L177-, Removing and Installing
Left/Right Daytime Running Lamp and Position Lamp LED Module -L176-/-L177-, Removing and Installing, through MY 2014
Removing
- Remove the headlamp housing. Refer to → Chapter "Headlamp, Removing and Installing, HID and LED Headlamps".
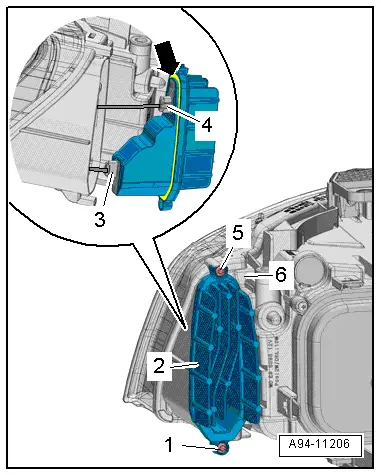
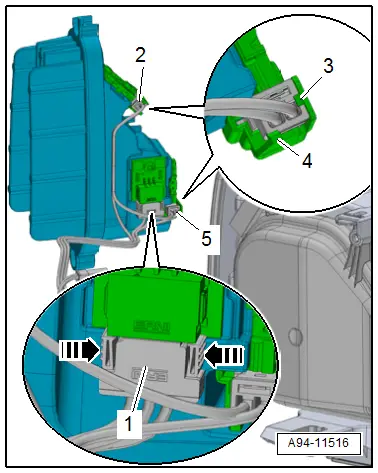
- Remove the bolts -1 and 5-.
- Remove the LED module -2- from the headlamp housing -6-.
Version 1:
- Disconnect the connectors -3 and 4-.
Version 2:
- Disconnect the connectors -2 and 5- by releasing the securing tabs -3 and 4-.
- Disconnect the connector -1- by pressing the release button with needle nose pliers -arrows-.
Installing
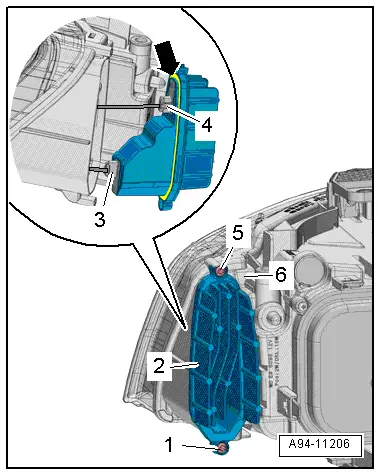
Install in reverse order of removal, while paying attention to the following:
- Check the seal -arrow- between the LED module and headlamp housing for damage.
Left/Right Daytime Running Lamp and Position Lamp LED Module -L176-/-L177-, Removing and Installing, HID Headlamps, from MY 2015
Removing
- Turn the light switch to position "0".
- Turn off the ignition and all electrical equipment and remove the ignition key.
- Do not operate the flasher.
- If equipped, remove the left air filter housing. Refer to → Rep. Gr.23; Air Filter; Air Filter Housing, Removing and Installing or → Rep. Gr.24; Air Filter; Air Filter Housing, Removing and Installing.
- Vehicles with TDI engine: Loosen fuel filter on and set aside with the lines connected. Refer to → Fuel Supply System; Rep. Gr.20; Fuel Filter; Fuel Filter, Removing and Installing.
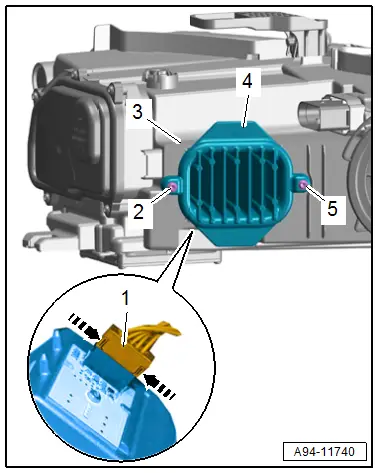
- Remove the bolts -2 and 5-.
- Remove the LED module -4- from the headlamp housing -3-.
- Disconnect the connector -1- by pressing the release button with needle nose pliers -arrows-.
Installing
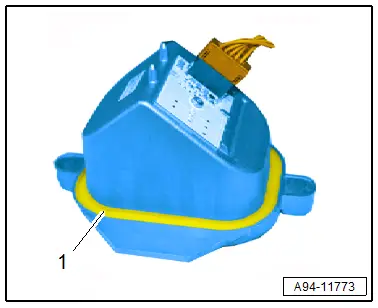
Install in reverse order of removal, while paying attention to the following:
- Check the seal -1- for damage.
Left/Right Daytime Running Lamp and Position Lamp LED Module -L176-/-L177-, Removing and Installing, LED Headlamps, from MY 2015
Removing
- Remove the headlamp housing. Refer to → Chapter "Headlamp, Removing and Installing, HID and LED Headlamps".
- Remove the bolts -1 and 3-.
- Remove the LED module -2- from the headlamp housing.
- Disconnect the connector -4- by pressing the release button using needle nose pliers -arrows-.
Installing
Install in reverse order of removal, while paying attention to the following:
- Check the seal -5- for damage.
Left/Right All Weather Lamp Bulb -M109-/-M110-, Removing and Installing
 Note
Note
This procedure applies to vehicles from MY 2015.
Removing
- Turn the light switch to position "0".
- Turn off the ignition and all electrical equipment and remove the ignition key.
- Do not operate the flasher.
- If equipped, remove the left air filter housing. Refer to → Rep. Gr.23; Air Filter; Air Filter Housing, Removing and Installing or → Rep. Gr.24; Air Filter; Air Filter Housing, Removing and Installing.
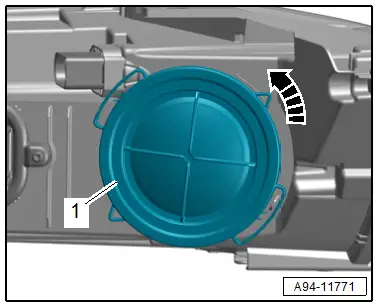
- Turn the housing cover -1- counter-clockwise -arrow- and remove it from the headlamp housing.
- Disconnect the connector -1-.
- Turn the bulb socket -2- in direction of the -arrow- and remove it.
Installing
Install in reverse order of removal, while paying attention to the following:
- Insert the new bulb in the socket. Do not touch the glass bulbs with bare hands.
- Close the housing cover clockwise.
