Audi Q3: Multifunction Steering Wheel
Overview - Multifunction Steering Wheel
- Buttons are integrated in the steering wheel for easier operation of Infotainment, telephone and the navigation system. On vehicles with Tiptronic, rocker switches are also installed on the left and right.
- The Multifunction Steering Wheel Control Module -J453- (in the right button) reads out the button information and transfers them over the LIN bus to the Steering Column Electronics Control Module -J527-. From the Steering Column Electronics Control Module -J527-, the information is transferred to the individual components via the CAN bus (comfort) and the Data Bus On Board Diagnostic Interface -J533-.
Perform the Fault Finding with the Vehicle Diagnostic Tester.
Overview - Multifunction Steering Wheel
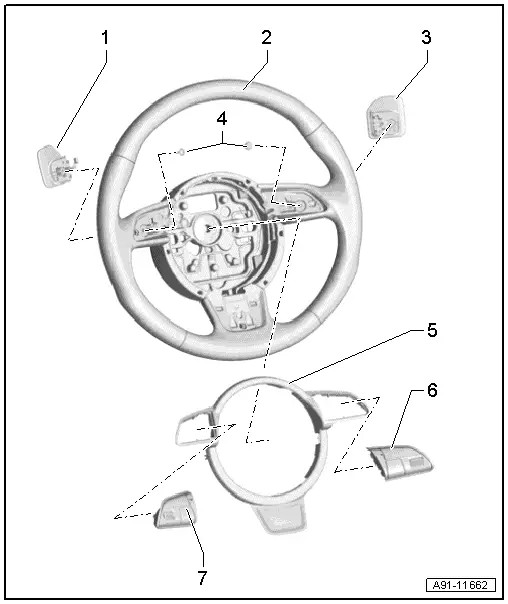
1 - Tiptronic Downshift Button on Steering Wheel -E439-
- Removing and installing. Refer to → Chapter "Tiptronic Downshift/Upshift Button on Steering Wheel -E439-/-E438-, Removing and Installing".
2 - 3-Spoke Steering Wheel
3 - Tiptronic Upshift Button on Steering Wheel -E438-
- Removing and installing. Refer to → Chapter "Tiptronic Downshift/Upshift Button on Steering Wheel -E439-/-E438-, Removing and Installing".
4 - Bolt
- 1 Nm
- Quantity: 2
5 - Decorative Trim
6 - Right Multifunction Buttons On Steering Wheel -E441-
- Removing and installing. Refer to → Chapter "Right/Left Multifunction Buttons on Steering Wheel -E441-/-E440-, Removing and Installing".
7 - Left Multifunction Buttons On Steering Wheel -E440-
- Removing and installing. Refer to → Chapter "Right/Left Multifunction Buttons on Steering Wheel -E441-/-E440-, Removing and Installing".
Right/Left Multifunction Buttons on Steering Wheel -E441-/-E440-, Removing and Installing
Special tools and workshop equipment required
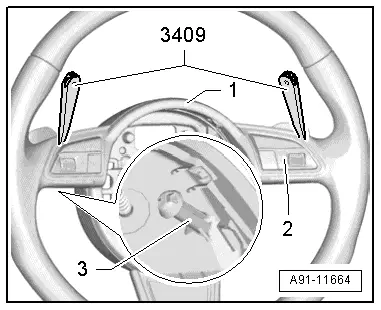
- Trim Removal Wedge -3409-
The multifunction buttons -2- are clipped to the decorative trim -1-. The decorative trim -1- and the multifunction buttons -2- are attached to the steering wheel. The multifunction buttons -2- have an extra retainer -3-.
When removing, first make sure the decorative trim -1- can be loosened by hand (approximately 5 mm). Then, using the Trim Removal Wedge -3409-, open the retainers -3- on the multifunction buttons -2- and remove the decorative trim -1- together with the multifunction buttons -2-.

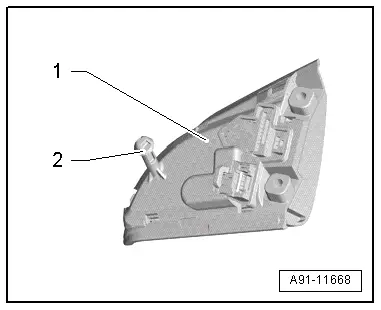
Decorative Trim Retainers
1 - Decorative Trim
Arrows - catches
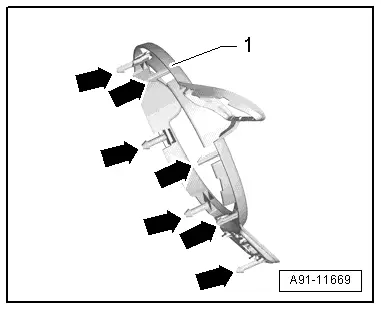
Multifunction Button Catches
1 - Multifunction button
2 - Retainer
Removing
- Turn off the ignition and all electrical equipment and remove the ignition key.
- Remove the driver airbag. Refer to → Body Interior; Rep. Gr.69; Driver Airbag; Driver Airbag Assembly Overview.
- Remove the connecting wires from the guides in the steering wheel.
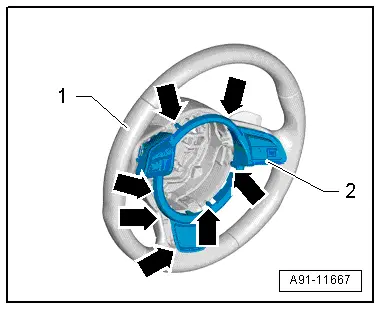
- Loosen the trim panel -2- with the multifunction buttons by hand -arrows- and remove it approximately 5 mm from the steering wheel -1-.

- Release the multifunction buttons -2- with the Trim Removal Wedge - 3409- next to the catches -3-. Use the Trim Removal Wedge -3409- as shown in the illustration.
- While doing this, be careful of the connectors to the tiptronic switches -2-.
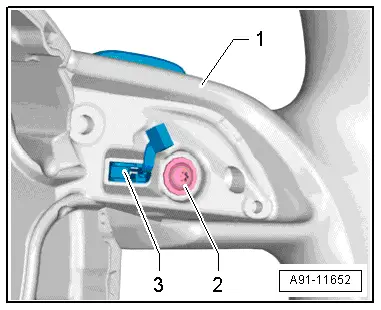
- Release and disconnect the connector -2- from the multifunction buttons.
- Remove the decorative trim with the multifunction buttons from the steering wheel.
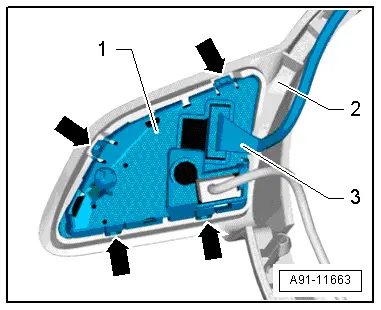
The multifunction buttons are attached to the decorative trim.
- Disconnect and remove the connector -3- from the multifunction button -1-.
- Open the clips -arrows- and push the multifunction button -1- out of the trim -2-.
The additional wire on the right multifunction button remains on the button.
Installing
- Install in reverse order of removal. Note the following:
- Place the decorative trim with mounted multifunction buttons onto the steering wheel.
- Route the connection cable for the tiptronic switch -2- as illustrated.
- Route the rest of the connection cable, including the connector, into the guides inside the steering wheel.

- Push the decorative trim -2- with multifunction buttons onto the steering wheel -1- until it engages securely.
- Finally, check the steering wheel again to make sure the wiring is correct.
Tiptronic Downshift/Upshift Button on Steering Wheel -E439-/-E438-, Removing and Installing
Removing
- Turn off the ignition and all electrical equipment and remove the ignition key.
- Remove the decorative trim with the multifunction buttons. Refer to → Chapter "Right/Left Multifunction Buttons on Steering Wheel -E441-/-E440-, Removing and Installing".
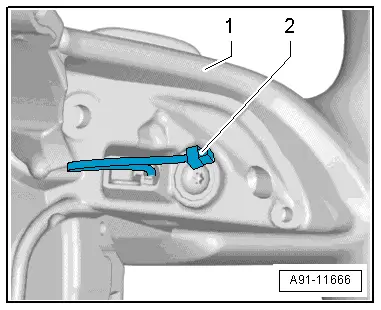
- Remove the bolt -2- on the steering wheel -1- and remove the Tiptronic switch -3- with the connecting cable to the rear.
Installing
- Install in reverse order of removal.
- Pay attention to the location of the connecting cable -2- to the multifunction button.

READ NEXT:
 Connection for External Multimedia Devices
Overview - External Multimedia Devices
There are several External Audio Source Connection -R199-
versions:
AMI (Audi Music Interface), MOST, UF7
The interface -1- is located in
the center conso
Mobile Online Services
Overview - Mobile Online Services
The Internet Access Control Module -J666- (Audi music
interface online, UE2) expands the External Audio Source
Connection -R199- (AMI) using the following functi
SEE MORE:
Adjusting Audi pre sense
Applies to: vehicles with Audi pre sense
You can switch Audi pre sense and the associated
systems on or off, or adjust them individually.
The settings depend on the vehicle equipment.
Applies to MMI: Select on the home screen: VEHICLE
> Driver assistance > Audi pre sense.
Setting the prew
Battery
Battery general information
Because of the complex power supply, all work
on batteries such as disconnecting, replacing,
etc., should only be performed by an authorized
Audi dealer or authorized Audi Service Facility.
Multiple batteries with different technologies
may be installed in your vehicle:
