Audi Q3: Seat Pan Cover and Cushion, Removing and Installing
Seat Pan Cover and Padding, Removing and Installing, Standard/Folding Seat
Special tools and workshop equipment required
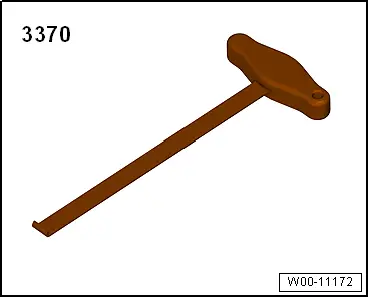
- Backrest Panel Tool -3370-
Removing
 WARNING
- Follow all safety precautions when working with pyrotechnic components. Refer to → Chapter "Pyrotechnic Components Safety Precautions".
- Before handling pyrotechnic components (for example, disconnecting the connector), the person handling it must "discharge static electricity". This can be done by touching the door striker, for example.
- Remove the front seat. Refer to → Chapter "Front Seat, Removing and Installing".
- Fasten the front seat on the Engine/Transmission Holder - Seat Repair Fixture -VAS6136-. Refer to → Chapter "Front Seat, Mounting on Fixture for Seat Repair".
- Remove the backrest. Refer to → Chapter "Front Backrest, Removing and Installing".
- Versions with passenger seat child seat anchor: remove the child seat anchor. Refer to → Chapter "Front Child Seat Anchor, Removing and Installing".
- Vehicles with drawer: remove the drawer. Refer to → Chapter "Drawer Mount, Removing and Installing".
- Equipment level with storage compartment: remove the storage compartment. Refer to → Chapter "Storage Compartment, Removing and Installing".
- Remove the sill panel side seat side trim with the bracket.
- Front seat manual. Refer to → Chapter "Seat Side Trim on Sill Panel Side, Removing and Installing, Manual Front Seat".
- Folding seat. Refer to → Chapter "Seat Side Trim on Sill Panel Side, Removing and Installing, Passenger Folding Seat".
- Front seat power. Refer to → Chapter "Seat Side Trim on Sill Panel Side, Removing and Installing, Power Front Seat".
- Disconnect and free up the connectors.
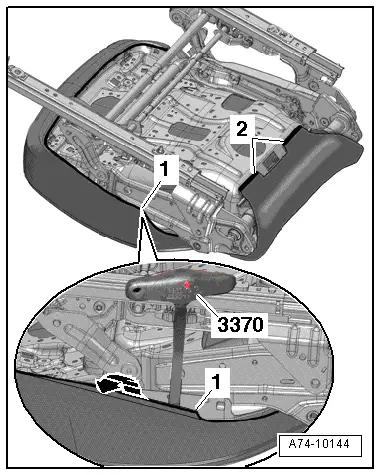
- Detach the molding -1- from the seat cover in the front and side areas using the Backrest Panel Tool -3370--arrow-.
- Detach molding -2- of the seat cover in the rear area using the Backrest Panel Tool -3370-.
- Remove the seat cover with the seat cushion from the seat pan. If necessary, free up the wiring harness for the seat heating and passenger occupant detection system.
Installing
 WARNING
- Follow all safety precautions when working with pyrotechnic components. Refer to → Chapter "Pyrotechnic Components Safety Precautions".
- Before handling pyrotechnic components (for example, connecting the connector), the person handling it must "discharge static electricity". This can be done by touching the door striker, for example.
- Observe all measures when installing the front seat. Refer to → Chapter "Front Seat, Removing and Installing".
Install in reverse order of removal.
Installation notes, for example tightening specifications, replacing components. Refer to → Chapter "Overview - Seat Pan Cover and Cushion, Standard/Folding Seat".
Seat Pan Cover and Padding, Removing and Installing, Sport Seat
Backrest Panel Tool -3370-
Removing
 WARNING
- Follow all safety precautions when working with pyrotechnic components. Refer to → Chapter "Pyrotechnic Components Safety Precautions".
- Before handling pyrotechnic components (for example, disconnecting the connector), the person handling it must "discharge static electricity". This can be done by touching the door striker, for example.
- Remove the backrest. Refer to → Chapter "Front Backrest, Removing and Installing, Standard/Sport Seat".
- Remove the support with seat depth adjustment seat cushion and seat cover. Refer to → Chapter "Seat Depth Adjuster, Removing and Installing".
- Versions with passenger seat child seat anchor: remove the child seat anchor. Refer to → Chapter "Front Child Seat Anchor, Removing and Installing".
- Equipment level with storage compartment: remove the storage compartment. Refer to → Chapter "Storage Compartment, Removing and Installing".
- Remove the sill panel side seat side trim with the bracket.
- Manual Sport seat. Refer to → Chapter "Seat Side Trim on Sill Panel Side, Removing and Installing, Manual Front Seat".
- Power Sport seat. Refer to → Chapter "Seat Side Trim on Sill Panel Side, Removing and Installing, Power Front Seat".
- Disconnect and free up the connectors.
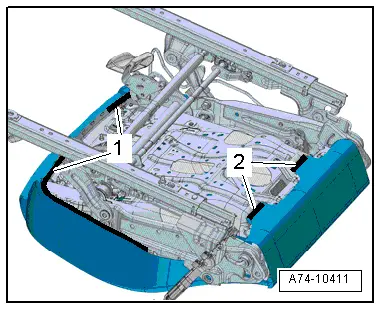
- Disengage the molding -1- on the side, and the molding -2- in the area of the rear seat cover using the Backrest Panel Tool -3370-.
- Remove the seat cover with the seat cushion from the seat pan. If necessary, free up the wiring harness for the seat heating and passenger occupant detection system.
 Note
Note
The seat depth adjuster support (plastic) remains on the seat cushion.
Installing
 WARNING
- Follow all safety precautions when working with pyrotechnic components. Refer to → Chapter "Pyrotechnic Components Safety Precautions".
- Before handling pyrotechnic components (for example, connecting the connector), the person handling it must "discharge static electricity". This can be done by touching the door striker, for example.
- Observe all measures when installing the front seat. Refer to → Chapter "Front Seat, Removing and Installing".
Install in reverse order of removal.
Installation notes, for example tightening specifications, replacing components. Refer to → Chapter "Overview - Seat Pan Cover and Padding, Sport Seat".
Backrest Cover and Cushion, Removing and Installing
Special tools and workshop equipment required
- Pry Lever -80-200-
Removing
 WARNING
- Follow all safety precautions when working with pyrotechnic components. Refer to → Chapter "Pyrotechnic Components Safety Precautions".
- Before handling pyrotechnic components (for example, disconnecting the connector), the person handling it must "discharge static electricity". This can be done by touching the door striker, for example.
- Remove the front seat. Refer to → Chapter "Front Seat, Removing and Installing".
- Fasten the front seat on the Engine/Transmission Holder - Seat Repair Fixture -VAS6136-. Refer to → Chapter "Front Seat, Mounting on Fixture for Seat Repair".
- Remove the backrest cover. Refer to → Chapter "Backrest Cover, Removing and Installing".
- Remove the headrest. Refer to → Chapter "Headrest, Removing and Installing".
- Remove the backrest. Refer to → Chapter "Front Backrest, Removing and Installing".
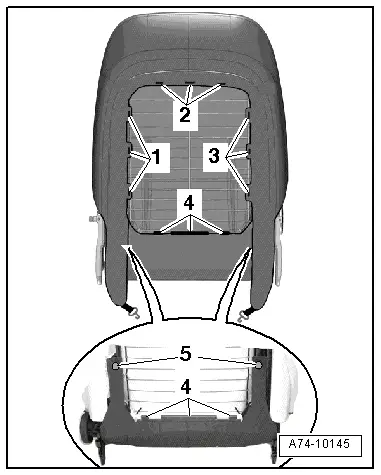
- Detach the rear moldings -1 through 4- from the backrest frame.
- Remove the backrest cover clips -5- from the backrest frame using a Pry Lever -80-200-.
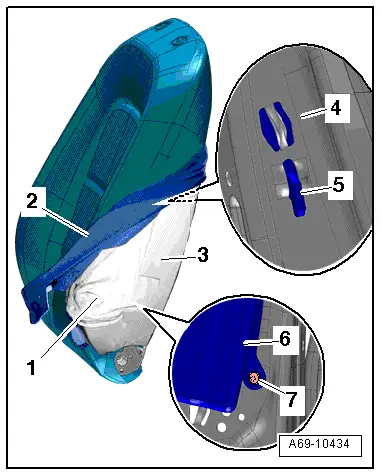
- Pull the backrest cover -2- with the backrest cushion -3- in the area of the side airbag carefully as far forward as possible, until the bolts -7- for the side airbag are accessible.
- Remove the bolt -7-.
- Release the side airbag -6- and the hook -5- from the backrest frame -4- and leave it in the pocket sewn into the cover -1-.
- Remove the backrest cover and backrest cushion upward and off the backrest frame while removing the side airbag and if necessary the backrest heating wiring harness.
Installing
 WARNING
- Follow all safety precautions when working with pyrotechnic components. Refer to → Chapter "Pyrotechnic Components Safety Precautions".
- Before handling pyrotechnic components (for example, connecting the connector), the person handling it must "discharge static electricity". This can be done by touching the door striker, for example.
- Observe all measures when installing the front seat. Refer to → Chapter "Front Seat, Removing and Installing".
Install in reverse order of removal.
Installation notes, for example tightening specifications, replacing components. Refer to → Chapter "Overview - Backrest Cover and Cushion".
