Audi Q3: Air Distribution Housing, Removing and Installing
Removing
- Remove the Air Conditioning (A/C) unit (heater). Refer to → Chapter "Heater and A/C Unit, Removing and Installing".
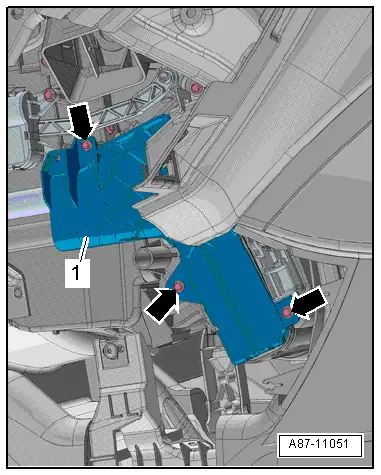
- Remove the bolts -arrows-.
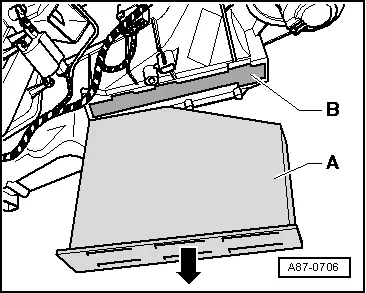
- Remove the heater core cover -1-.
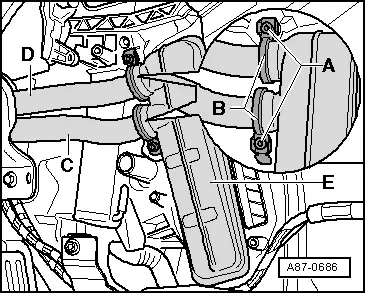
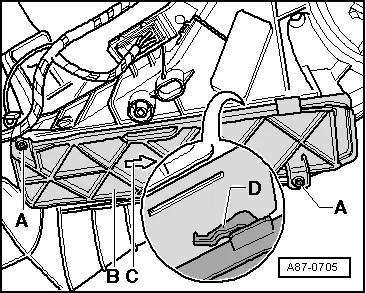
- Remove the bolts -A-.
- Remove the clamps -B-.
- Remove the coolant pipes -C and D- from the heater core -E- and move to the side.
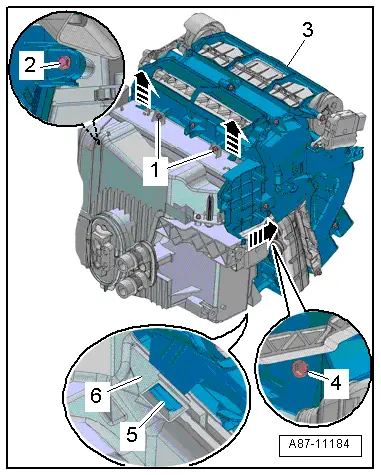
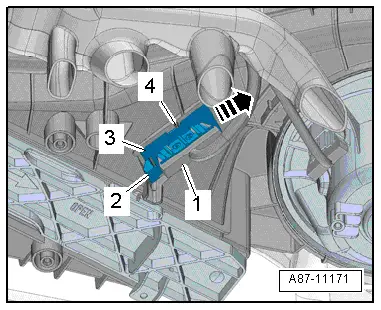
- Remove the bolts -1, 2 and 4-.
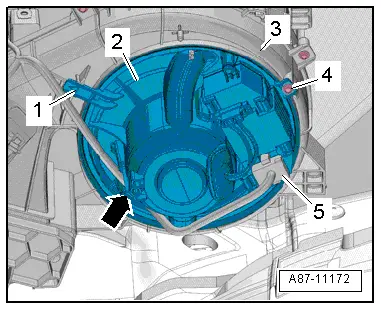
- Release the tabs -arrows- and move the air distribution housing -3- toward the rear, while disengaging the guides -5- on the evaporator housing lower section -6-.
Installing
Installation is done is reverse order, observe the following:
- Install the A/C unit (heater). Refer to → Chapter "Heater and A/C Unit, Removing and Installing".
Dust and Pollen Filter, Removing and Installing
Special tools and workshop equipment required
- Commercially available vacuum cleaner
 Note
Note
- Observe the replacement interval. Refer to the →Maintenance Intervals; Rep. Gr.03.
- There are different versions: For vehicles with the version without the Air Quality Sensor -G238-, there is currently a dust and pollen filter without an activated charcoal filter element installed, and for vehicles with the Air Quality Sensor -G238-, a dust and pollen filter with an activated charcoal filter element is installed. Refer to Parts Catalog.
- On vehicles with driving school equipment, pedals of driving school equipment must be removed if necessary (depending on version, service disconnect points are present on driving school pedals. Refer to the Driving School Equipment Installation Instructions.
Removing
- Loosen the quick release -arrows- with a screwdriver.
- Remove the cover -1-.
- Cover the floor carpet in the front passenger footwell beneath the dust and pollen filter with paper (to capture any falling debris).
- If equipped, remove the bolts -A-.
- Slide the shaft cover -B- in the direction of the -arrow C- and remove it downward.
- Remove the dust and pollen filter -A- from the housing -B-.
Installing
Installation is done is reverse order, observe the following:
- Clean the area around the dust and pollen filter in the heater shaft before installing a new filter, using for example a vacuum cleaner.
- Insert the dust and pollen filter so that the slanted side faces the fresh air blower.
- Position the shaft cover -1- and slide it to the left up to the stop.
 Note
Note
If the retainers for the shaft covers are faulty, the shaft cover can be secured with bolts.
Fresh Air Blower -V2-, Removing and Installing
 Note
Note
There are different versions for the manual climate control system (heater without Air Conditioning (A/C) system) and for the automatic climate control system. Refer to the Parts Catalog.
Removing
- Loosen the quick release -arrows- with a screwdriver.
- Remove the cover -1-.

- Disconnect the connector -5-.
- For vehicles with an automatic climate control system, free up the wiring harness -arrow-.
- If equipped, remove the bolt -4-.
- Lift the securing tab -1- and turn the fresh air blower -2- counter-clockwise.
- Remove the fresh air blower from the evaporator housing lower section -3-.
 Caution
Fan wheel imbalance.
Do not grasp fan wheel of the Fresh Air Blower -V2-, force against the fan wheel or shifting the balancing weights fastened to fan wheel may cause imbalance and then problems during operation.
Installing
Install in reverse order of removal.
Fresh Air Blower Series Resistor with Fuse -N24-, Removing and Installing
 Note
Note
Only for vehicles with a manual climate control system (heater without A/C system).
 WARNING
There is a risk of burns.
- The Fresh Air Blower Series Resistor With Fuse -N24- may be hot.
- Allow the series resistor to cool before removing.
Removing
- Loosen the quick release -arrows- with a screwdriver.
- Remove the cover -1-.

- Disconnect the connector -1-.
- Release the tab -2- and slide the series resistor -3- in the direction of -arrow- until it stops -4-.
- Remove the series resistor downward.
Installing
Installation is done is reverse order, observe the following:
- The series resistor must sit correctly in the mount so that the tab audibly engages.
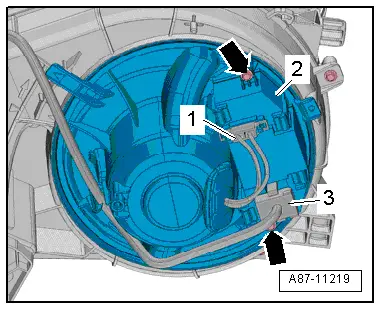
Fresh Air Blower Control Module -J126-, Removing and Installing
 Note
Note
Only on vehicles with an automatic climate control system
Removing
- Loosen the quick release -arrows- with a screwdriver.
- Remove the cover -1-.

- Disconnect the connectors -1 and 3-.
- Remove the bolts -arrows-.
 WARNING
There is a risk of burns.
- If the Fresh Air Blower -V2- with the Fresh Air Blower Control Module -J126- was in operation before the removal, it may be hot.
- Do not touch the hot radiating surface of the Fresh Air Blower Control Module -J126-.
- Remove the control module -2- from the fresh air blower.
Installing
Installation is done is reverse order, observe the following:
- Tighten the bolts to the tightening specification.
After completing the repair work, perform the following operations on the control head using the Vehicle Diagnostic Tester in the "Guided Fault Finding" function:
- Check the Diagnostic Trouble Code (DTC) memory and delete any currently displayed entries.
- Perform the basic setting.
- Perform output diagnostic test mode (DTM).
READ NEXT:
 Heater Core, Removing and Installing
Special tools and workshop equipment
required
Hose Clamps - Up To 25mm -3094-
Engine Bung Set -VAS6122-
Compressed air gun, commercially available
Note
Depending on the engine v
Condensation Water Drain, Checking
Procedure
- Remove the glove compartment. Refer to
→ Body Interior; Rep. Gr.68; Storage Compartments and Covers;
Glove Compartment, Removing and Installing.
- Remove t
SEE MORE:
Component Location Overview - Components Outside of Passenger Compartment
Component Location Overview - Components Outside of Passenger Compartment,
Front Component Group "1"
Note
Depending on the engine version to support the engine
coolant pump an After-Run Coolant Pump -V51-/Heater Support Pump
-V488- may be installed (different designations depending
Component Location Overview - Access/Start Authorization System
1 - Electronic Steering Column Lock Control Module -J764-
Overview. Refer to
→ Chapter "Overview - Steering Column Switch Module, with Electronic
Ignition Switch".
2 - Steering Column
3 - Access/Start Authorization Control Module -J518-
Removing
