Audi Q3: Air Quality Sensor -G238-, Removing and Installing
Removing
- Remove the plenum chamber cover. Refer to → Body Exterior; Rep. Gr.50; Bulkhead; Plenum Chamber Cover, Removing and Installing.
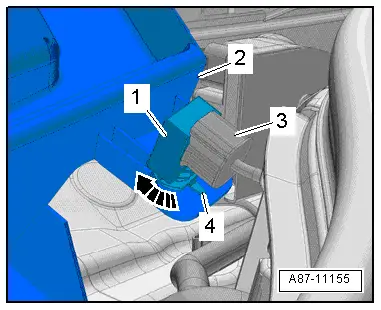
- Release the securing tab -4- and turn the housing -1- for the Air Quality Sensor -G238- counter-clockwise -arrow-.
- Remove the housing from the rain water drain channel -2- for the fresh air intake.
- Disconnect the connector -3-.
 Note
Note
Do not store a removed Air Quality Sensor -G238- in areas where it can come into contact with solvents, fuels, and certain chemical compositions (fluids or vapors).
Installing
Installation is done is reverse order, observe the following:
 Note
Note
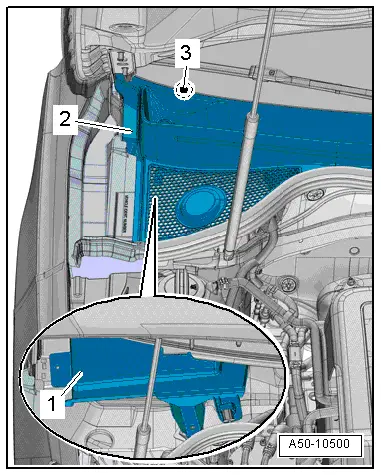
- So that no water enters into the A/C unit (heater) via the rain water drain channel -1- when the plenum chamber cover -2- is installed, the plenum chamber cover must not be damaged.
- If the plenum chamber cover is damaged or is installed incorrectly, water can flow into the fresh air intake duct via the rain water drain channel.
- The plenum chamber cover must be completely engaged in the windshield frame -3-. Refer to → Body Exterior; Rep. Gr.50; Bulkhead; Plenum Chamber Cover, Removing and Installing.
- Install the plenum chamber cover. Refer to → Body Exterior; Rep. Gr.50; Bulkhead; Plenum Chamber Cover, Removing and Installing.
READ NEXT:
 Outside Air Temperature Sensor -G17-, Removing and Installing
Note
Complaints may arise regarding the Air Conditioning (A/C)
system regulation if there is a faulty measured value for the
Outside Air Temperature Sensor -G17-. Refer to Vehicle
Diag
Humidity Sensor -G355-, Removing and Installing
Humidity Sensor -G355-, Removing and Installing, Vehicles without
Driver Assistance Systems Front Camera
Note
Only on vehicles with an automatic climate control system
There are diffSEE MORE:
Trailer hitch
Introduction
Only use a trailer hitch with a removable ball
hitch mount and ball hitch. The trailer hitch must
be permitted for the vehicle, the trailer and the
permitted total weight of the trailer being
pulled. Above all, it must be securely and safely
attached to the vehicle trailer.
Never mount
Tires, Rolling Noises
Tires, Rolling Noises, General Information
Rolling noise perceived by the human ear is caused by
vibrations transmitted from the noise source to the ear via the
air.
Here we are interested in noises created by certain
characteristics of the tires as well as the effects of rolling
(noise so