Audi Q3: Front Brake Caliper, Replacing
Brake Caliper, Replacing,1LJ, 1 ZD Brakes
 Note
Note
In the following description the brake caliper is removed and replaced. The brake hose is removed.
Special tools and workshop equipment required
- Torque Wrench 1331 5-50Nm -VAG1331-
- Brake Pedal Actuator -VAG1869/2-.
- Container -1- from the Brake Charger/Bleeder Unit -VAS5234-
Removing
- Remove the affected front wheel, refer to → Suspension, Wheels, Steering; Rep. Gr.44; Wheels and Tires.
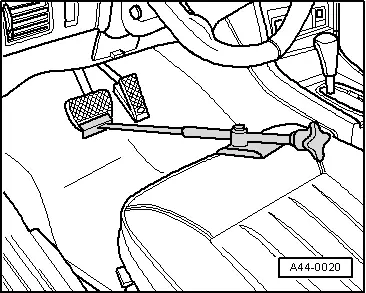
- Insert the Brake Pedal Actuator -VAG1869/2- between the brake pedal and driver seat. Preload the brake pedal at least 60 mm.
 Note
Note
By doing this, the valves in the brake master cylinder are closed and the brake fluid reservoir does not run empty.
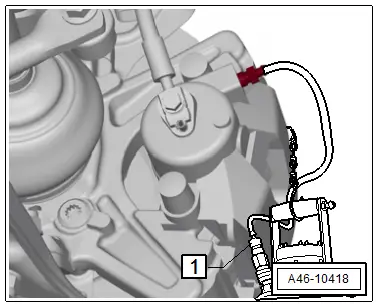
- Remove the protective cap on brake caliper bleeder screw.
- Place the container bleed hose -1- on the bleeder screw.
- Open the bleeder screw to reduce the pressure in the hydraulic system.
- Close the bleeder screw and remove the container.
 Note
Note
Do not remove the Brake Pedal Actuator -VAG1869/2-.
- Remove brake hose from brake caliper.
- Remove brake pads, refer to → Chapter "Brake Pads, Removing and Installing, 1LJ, 1ZD Brakes".
Installing
Only bleed the brakes on the wheel which the brake caliper and the brake line was separated.
Install in reverse order of removal. Note the following:
- Install the brake hose into the brake caliper and tighten.
 Note
Note
- Make sure the brake hose is routed correctly.
- Make sure the brake hose is not blocked, bent or rubbing against the vehicle.
- Install the brake pads, refer to → Chapter "Brake Pads, Removing and Installing, 1LJ, 1ZD Brakes".
- Remove the Brake Pedal Actuator -VAG1869/2-.
- Only bleed the brakes on the wheel which the brake caliper and the brake line was separated, refer to → Chapter "Hydraulic System, Bleeding".
 Note
Note
Only bleed the brakes on the wheel which the brake caliper and the brake line was separated. If the brake pedal still feels "soft", completely bleed the brakes. Refer to → Chapter.
- Install the front wheel, refer to →Suspension, Wheels, Steering; Rep. Gr.44.
 WARNING
Risk of accident!
- Before moving the vehicle, depress brake pedal several times firmly to properly seat brake pads in their normal operating position.
- Make sure the brakes are working correctly before driving the vehicle.
Brake Caliper, Replacing, 1LA, 1ZT Brakes
 Note
Note
In the following description the brake caliper is removed and replaced. The brake hose is removed.
Special tools and workshop equipment required
- Torque Wrench 1331 5-50Nm -VAG1331-
- Brake Pedal Actuator -VAG1869/2-.
- Container -1- from the Brake Charger/Bleeder Unit -VAS5234-
Removing
- Remove the affected front wheel, refer to → Suspension, Wheels, Steering; Rep. Gr.44; Wheels and Tires.
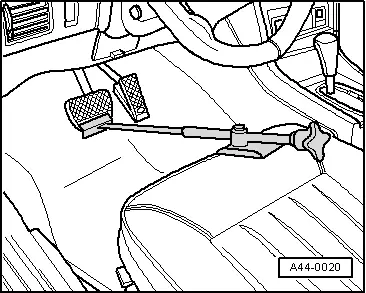
- Insert the Brake Pedal Actuator -VAG1869/2- between the brake pedal and driver seat. Preload the brake pedal at least 60 mm.
 Note
Note
By doing this, the valves in the brake master cylinder are closed and the brake fluid reservoir does not run empty.
 WARNING
Risk of skin irritation.
To prevent skin contact with brake fluid, wear chemical resistant protective gloves.
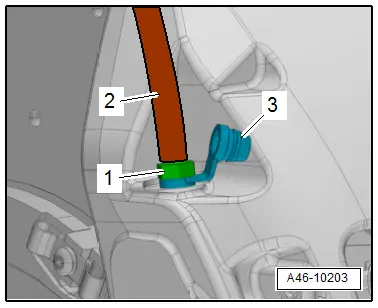
- Remove the protective cap -3- from the bleeder screw -1-.
- Connect the bleeder bottle hose -2- as shown in the illustration.
- Open the bleeder screw to reduce the pressure in the brake system.
- Close the bleeder screw and remove the bleeder bottle.
 Note
Note
Do not remove the Brake Pedal Actuator -VAG1869/2-.
 Note
Note
Place a cloth underneath to catch any brake fluid leaking out.
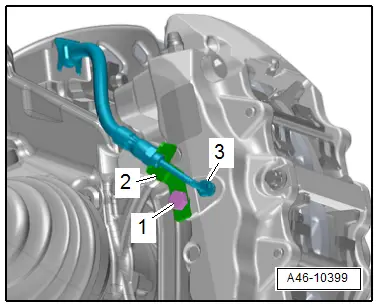
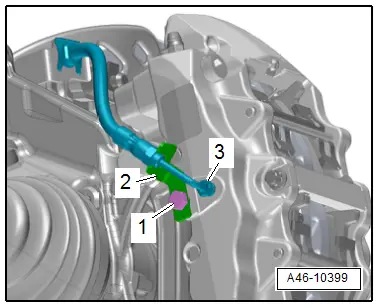
- Remove the union bolt -3- and bolt -1-.
- Remove the bracket -2- and move the brake hose to the side.
- Seal the open brake hose immediately with sealing plugs from the Repair Kit -1H0 698 311 A-.
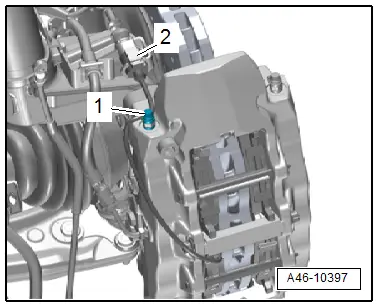
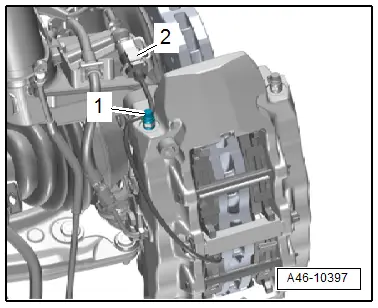
- Disconnect the brake pad wear sensor connector -2-.
 Note
Note
Ignore item -1-.
 Caution
Risk of contamination from escaping brake fluid.
When the brake lines are pressed the brake fluid flows out.
 Note
Note
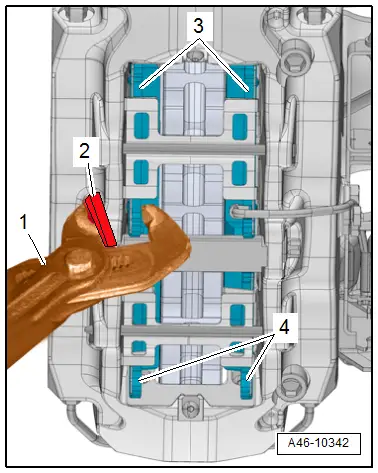
For easier removal of the brake caliper from the brake rotor, push the brake pads -3 and 4- back lightly with pliers -1-. To prevent damage to the coating on the brake caliper, place a piece of rubber -2- between, as shown in the illustration.
- Seal the open connection on the brake caliper immediately with sealing plugs from the Repair Kit -1H0 698 311 A-.
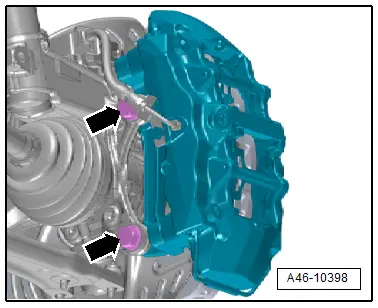
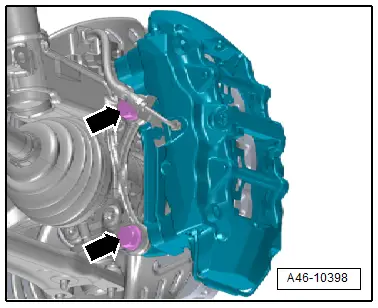
- Unscrew the bolts -arrows- and carefully remove the brake caliper with the brake pads from the brake rotor.
- If necessary, remove the brake pads, refer to → Chapter "Brake Pads, Removing and Installing, Brakes 1LA, 1ZT".
Installing
Only bleed the brakes on the wheel which the brake caliper and the brake line was separated.
Install in reverse order of removal. Note the following:
 WARNING
Health Risk.
Do not blow out brake system with compressed air.
- Bring the brake caliper into its installed position and tighten the new bolts -arrows-.
- Install the brake pads, refer to → Chapter "Brake Pads, Removing and Installing, Brakes 1LA, 1ZT".
- Tighten the brake hose -3- and bracket -2- with the bolt -1-.
- Connect the connector -2-.
 Note
Note
- Make sure that the connector and brake hose are routed correctly.
- Make sure the brake hose is not blocked, bent or rubbing against the vehicle.
- Remove the Brake Pedal Actuator -VAG1869/2-.
- Only bleed the brakes on the wheel which the brake caliper and the brake line was separated, refer to → Chapter "Hydraulic System, Bleeding".
 Note
Note
Only bleed the brakes on the wheel which the brake caliper and the brake line was separated. If the brake pedal still feels "soft", completely bleed the brakes, refer to → Chapter "Hydraulic System, Bleeding".
- Install the front wheel, refer to →Suspension, Wheels, Steering; Rep. Gr.44.
 WARNING
Risk of accident!
- Before moving vehicle, depress brake pedal several times firmly to properly seat brake pads in their normal operating position.
- Make sure the brakes are working correctly before driving the vehicle.

