Audi Q3: Lower Control Arm, Removing and Installing
Special tools and workshop equipment required
- Locating Pins -T10096-
- Torque Wrench 1332 40-200Nm -VAG1332-
Removing
- Before starting work, determine the measurement -a-, for example with tape measure, from center of wheel to lower edge of wheelhouse.
 Note
Note
Measurement must be performed in curb weight position (unloaded condition).
- Note the measured values. It will be required for tightening bolts/nuts.

- Remove the front wheel. Refer to → Chapter "Wheels and Tires".
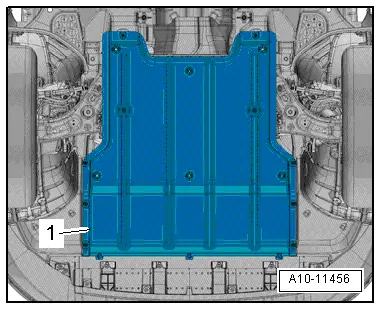
- Remove the noise insulation -1-. Refer to → Body Exterior; Rep. Gr.66; Noise Insulation; Noise Insulation, Removing and Installing.
- If installed, remove the nut -4- and free up the coupling rod from the Left Front Level Control System Sensor -G78- or Right Front Level Control Sensor -G289--3-.
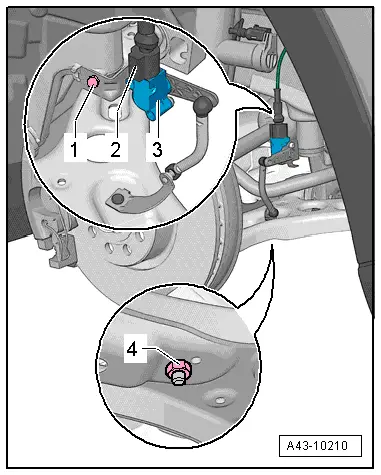
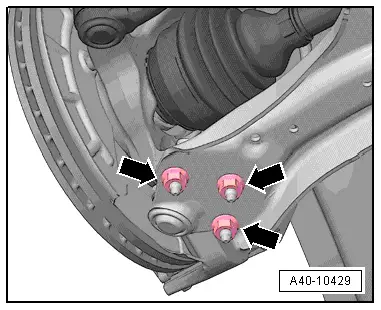
- Remove the nuts -arrows-.
- Remove both the wheel bearing housing and ball joint from the control arm.
 Note
Note
Pay attention during the assembly work that the ball joint rubber boot is not damaged. If necessary protect the ball joint rubber boot against damage.

- Replace the bolt with the Locating Pins -T10096--arrow- and tighten to 20 Nm.
 Caution
The locating pins may only be tightened to a maximum of 20 Nm, since otherwise the locating pin threads will be damaged.
- Remove the bolts -1-.
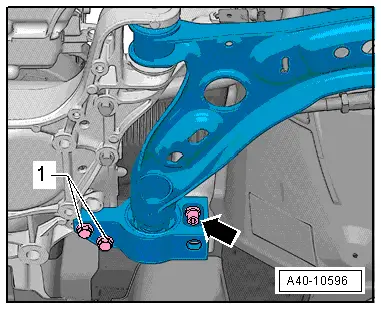
- Remove the bolt -arrow-.
 Note
Note
On vehicles where the bolt -arrow- is not to be removed, the subframe must be lowered. Refer to → Chapter "Subframe, Lowering".
- Remove the control arm -1-.
Installing
Installation is reverse of removal, noting the following:

- Insert the control arm -1- with the mounting bracket into the subframe.
- Position the bolt -arrow- but do not tighten yet.

- Insert bolts -1- and tighten.
- Now replace Locating Pin -T10096- with a new bolt and tighten it.

- Bolt control arm tightly to ball joint -arrows-.
- Tighten the bolt -arrow- in the curb weight position. Refer to → Chapter "Wheel Bearing in Curb Weight, Lifting Vehicles with Coil Spring".
 Note
Note
Make sure the ball joint boot is not damaged or twisted.
- Install the front wheel. Refer to → Chapter "Wheels and Tires".
- An axle alignment may be required. Refer to → Chapter "Evaluating Need for Axle Alignment".
- On vehicles with electronically controlled damping, perform the function "Adapt the control position" with the Vehicle Diagnosis Tester.
- If the control position was reprogrammed and if the vehicle has lane assist, then it will then be necessary to calibrate the driver assistance systems front camera. Refer to → Chapter "Driver Assistance Systems Front Camera, Calibrating".
- On vehicles with level control system sensor, perform headlamp basic setting. Refer to → Electrical Equipment; Rep. Gr.94; Headlamp, Adjusting.

Mounting Bracket with Control Arm Bearing, Replacing
Special tools and workshop equipment required
- Press Piece - Guide Pin -VW439-
- Press Plate -VW401-
- Press Plate -VW402-
- Press Piece - Multiple Use -VW426-
- Installation Lubricant -G 294 421 A1-. Refer to the Parts Catalog
Pressing off mounting bracket with bearing for control arm:
- Control arm removed. Refer to → Chapter "Lower Control Arm, Removing and Installing".
Bonded rubber bushing is available as a replacement part only with the mounting bracket.
- Press the mounting bracket with bonded rubber bushing off the control arm.
 Note
Note
Hold the control arm firmly when pressing out.
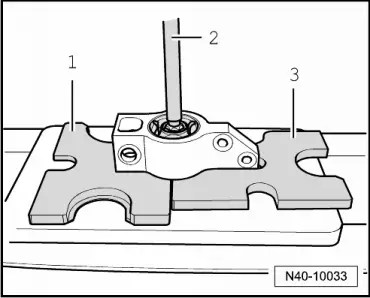
1 - Press Plate -VW401-
2 - Press Piece - Guide Pin -VW439-
3 - Press Plate -VW402-
Pressing on mounting bracket with bearing on control arm:
- Coat the control arm hex fitting with Installation Lubricant -G 294 421 A1-.
- Carefully press bearing onto control arm as far as stop.
1 - Press Piece - Multiple Use -VW426-
2 - Mounting bracket with bonded rubber bushing
3 - Control Arm
4 - Press Plate -VW401-

READ NEXT:
 Ball Joint, Removing and Installing
Special tools and workshop equipment
required
Puller - Ball Joint -3287A-
Digital Torque Wrench -VAG1756A-
Torque Wrench 1332 Insert - Ring Wrench - 18mm -VAG1332/10-
Removing
- Loo
Overview - Wheel Bearing
1 - Suspension Strut
2 - Bolt
70 Nm + 90º
Always replace if removed
Bolt point must face in direction of travel.
3 - Front Speed Sensor
Removing and in
Wheel Bearing Housing, Removing and Installing
Special tools and workshop equipment
required
Puller - Ball Joint -3287A-
Torque Wrench 1332 40-200Nm -VAG1332-
Engine and Gearbox Jack -VAS6931-
Digital Torque Wrench -VAG1756A-
Spreade
SEE MORE:
Backrest Adjuster, Removing and Installing
Backrest Adjustment Hand Wheel, Removing and Installing
Note
Only the hand wheel for the backrest adjustment wheel can be
removed and installed.
Special tools and workshop equipment
required
Assembly Tool -3399-
Removing
- Move the front seat all the way forward/up.
-&n
Overview - Seat Pan, Drawer
1 - Retaining Tab
2 - Drawer
3 - Bolt
1.5 Nm
4 - Bolt
1.5 Nm
5 - Mount
For the drawer
Removing and installing. Refer to
→ Chapter "Drawer Mount, Removing and Installing".
Overview - Seat Pan, Storage Compartment
