Audi Q3: Overview - Front Three-Point Seat Belt
Audi Q3 (8U) 2011-2018 Service Manual / Body / Body Interior / Passenger Protection, Airbags, Seat Belts / Overview - Front Three-Point Seat Belt
Overview - Front Three-Point Seat Belt, USA and Canada Market
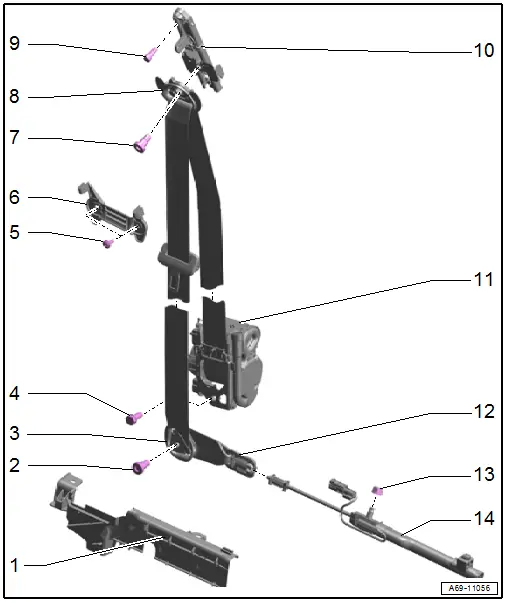
1 - Belt End Fitting Cover
- Removing and installing. Refer to → Chapter "Front Belt End Fitting, Removing and Installing, USA and Canada Market-Specific".
2 - Bolt
- 45 Nm
- If it was removed because of an accident, replace the bolt
3 - Seat Belt Guide
- Must swing into vertical position or carrier direction by itself after tightening screw.
4 - Bolt
- 45 Nm
- If it was removed because of an accident, replace the bolt
5 - Bolt
- 5 Nm
- Quantity: 2
- If it was removed because of an accident, replace the bolt
6 - Front Seat Belt Guide
- Removing and installing. Refer to → Chapter "Front Seat Belt Guide, Removing and Installing".
- Place the belt into the depression in the front belt guide.
- Do not jam or damage the belt
- Install the seat belt guide front alignment pin in the openings on the B-pillar.
7 - Bolt
- 45 Nm
- If it was removed because of an accident, replace the bolt
8 - Seat Belt Guide
- Must swing into vertical position or carrier direction by itself after tightening screw.
9 - Bolt
- 27 Nm
- If it was removed because of an accident, replace the bolt
10 - Seat Belt Height Adjuster
- Removing and installing. Refer to → Chapter "Seat Belt Height Adjuster, Removing and Installing".
- Always replaced if the belt tensioner has deployed with the belt on
11 - Automatic Belt Retractor
- Drivers side: with Driver Seat Belt Tensioner Igniter 1 -N153- and Driver Belt Force Limiter -G551-
- Front passenger side: with Front Passenger Seat Belt Tensioner Igniter 1 -N154- and Front Passenger Belt Force Limiter -G552-
- Removing and installing. Refer to → Chapter "Front Three-Point Seat Belt, Removing and Installing".
12 - Belt End Fitting
- Removing and installing. Refer to → Chapter "Front Belt End Fitting, Removing and Installing, USA and Canada Market-Specific".
13 - Nut
- 45 Nm
- Replace the bolt if it was removed because of an accident when the seat belt was buckled.
14 - Driver Seat Belt Tensioner Igniter 2 -N297-
- Passenger side: Front Passenger Seat Belt Tensioner Igniter 2 -N298-
- Removing and installing. Refer to → Chapter "Front Belt Tensioner, Removing and Installing, USA and Canada Market-Specific".
Overview - Front Three-Point Seat Belt, Not USA and Canada Market-Specific
NOT FOR NORTH AMERICAN MARKET

1 - Cap
2 - Bolt
- If it was removed because of an accident, replace the bolt
- 45 Nm
3 - Front Belt End Fitting
- Removing and installing. Refer to → Chapter "Front Belt End Fitting, Removing and Installing".
4 - Bolt
- Quantity: 2
- If it was removed because of an accident, replace the bolt
- 5 Nm
5 - Front seat belt guide
- Removing and installing. Refer to → Chapter "Front Seat Belt Guide, Removing and Installing".
- Place the belt into the depression in the front belt guide.
- Do not jam or damage the belt
- Install the seat belt guide front alignment pin in the openings on the B-pillar.
6 - Bolt
- If it was removed because of an accident, replace the bolt
- 45 Nm
7 - Seat Belt Guide
- Must swing into vertical position or carrier direction by itself after tightening screw.
8 - Bolt
- If it was removed because of an accident, replace the bolt
- 27 Nm
9 - Seat Belt Height Adjuster
- Removing and installing. Refer to → Chapter "Seat Belt Height Adjuster, Removing and Installing".
- Always replaced if the belt tensioner has deployed with the belt on
10 - Automatic Belt Retractor
- Driver side: with Driver Seat Belt Tensioner Igniter 1 -N153-
- Front passenger side: with Front Passenger Seat Belt Tensioner Igniter 1 -N154-
- Removing and installing. Refer to → Chapter "Front Three-Point Seat Belt, Removing and Installing".
11 - Connector
- Driver side: for Driver Seat Belt Tensioner Igniter 1 -N153-
- Front passenger side: for Front Passenger Seat Belt Tensioner Igniter 1 -N154-
- Disconnecting and connecting. Refer to → Chapter "Front Three-Point Seat Belt, Removing and Installing".
12 - Bolt
- If it was removed because of an accident, replace the bolt
- 45 Nm
13 - Stop sleeves
READ NEXT:
 Overview - Rear Outer Three-Point Seat Belt
1 - Belt Guide
Caution
Do not rotate bolts under any circumstances when removing
and installing belt guide. They are set by the manufacturer.
Replace the entire belt gui
Front Three-Point Seat Belt, Removing and Installing
Front Three-Point Seat Belt, Removing and Installing
Removing
WARNING
Follow all safety precautions when working with
pyrotechnic components. Refer to
→ Chapter "Pyrotechnic
Rear Three-Point Seat Belt, Removing and Installing
Outer Rear Three-Point Seat Belt, Removing and Installing
Removing
- Remove the rear outer belt end fitting. Refer to
→ Chapter "Rear Outer Belt End Fitting, Removing and Installing".
SEE MORE:
A/C Compressor, Removing and Installing on Bracket
A/C Compressor, Removing and Installing from Bracket, 4-Cylinder Engine
Note
The Air Conditioning (A/C) compressor can be removed and
installed at the bracket without opening the refrigerant lines.
In the following, removal and installation of compressor is
described for a vehicl
Overview - Wheel Bearing
Overview - Wheel Bearing, Vehicles with FWD
1 - Cover
2 - Bracket
3 - Bolt
50 Nm + 45º
Always replace if removed
4 - Coupling Rod
5 - Bolt
90 Nm + 45º
Always replace if removed
Follow the tightening sequence. Refer to
6&n
© 2019-2025 Copyright www.auq3.net
