Audi Q3: Steering Column
Overview - Steering Column
 Note
Note
Always replace corroded bolts/nuts.
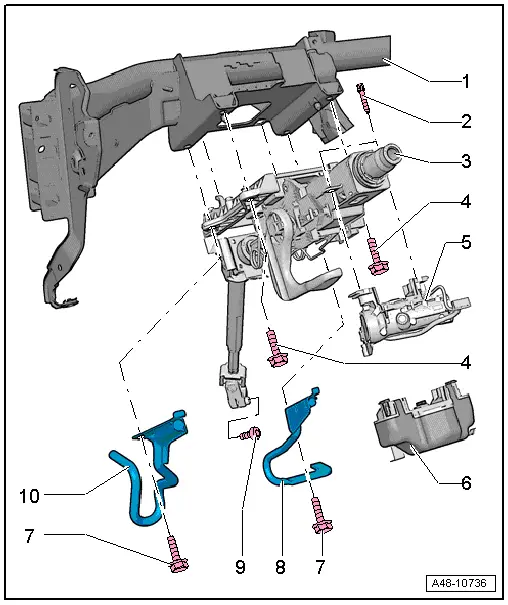
1 - Instrument Panel Central Tube
2 - Shear Bolt
- Tighten the shear bolt until head shears off.
3 - Steering Column
- Removing and installing. Refer to → Chapter "Steering Column, Removing and Installing".
4 - Bolt
- 20 Nm
- Always replace if removed
5 - Steering Lock Housing with Lock Cylinder and Ignition/Starter Switch -D-
- Removing and installing. Refer to → Electrical Equipment; Rep. Gr.94; Steering Column Switch Module; Steering Lock Housing, Removing and Installing.
6 - Electronic Steering Column Lock Control Module -J764-
- Installed on vehicles with "Keyless Access Authorization System"
- Removing and installing. Refer to → Chapter "Electronic Steering Column Lock Control Module -J764-, Removing and Installing".
7 - Bolt
- 20 Nm
- Always replace if removed
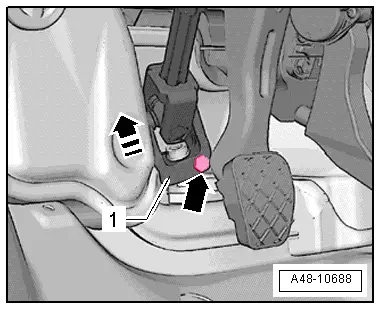
8 - Brake Pedal Crash Brace
9 - Bolt
- 30 Nm
- Always replace if removed
- Clean the threaded hole (for example, using a thread tap) before installing the new bolt.
10 - Clutch Pedal Crash Brace
Steering Column, Checking for Damage
Visual check
- Check whether parts of steering column indicate damage.
Functional check
- Check that the steering column turns easily without jerking.
- Check that the steering column can be adjusted with respect to height and reach.
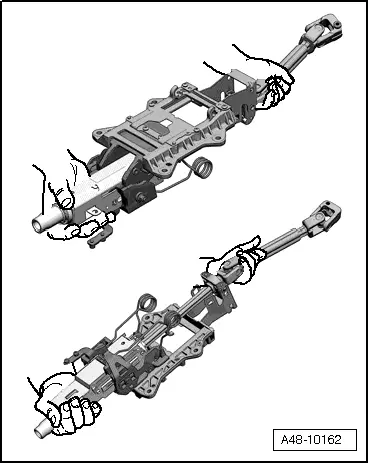
Steering Column, Handling and Transporting
 WARNING
- The correct handling of the steering column must always be observed.
- Incorrect handling of steering column may cause damage to steering column and therefore lead to a safety risk.
Correct handling and transport of steering column
- Transport steering column with two hands
- Hold steering column at upper steering rod tube and in area of upper universal joint
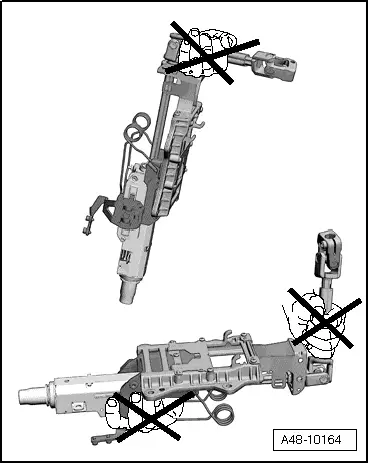
Incorrect handling of steering column
Transporting at the following components leads to pre-damage to steering column:
1 - Clamping Lever
2 - Weight Compensation Springs
3 - Deformation Element
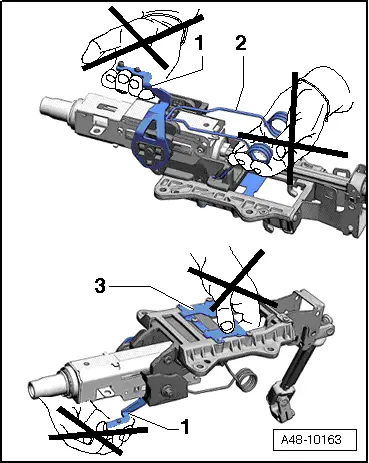
Damage to universal joint bushings on lower steering column bushing due to:
- Holding and carrying the steering column with a hand on the connecting shaft
- Bending joints more than 90º
Steering Column, Removing and Installing
Special tools and workshop equipment required
- Torque Wrench 1331 5-50Nm -VAG1331-
- Torque Wrench 1332 40-200Nm -VAG1332-
Removing
The steering column is delivered only as a complete replacement part. Service is not possible.
The steering lock housing can be modified.
The Electronic Steering Column Lock Control Module -J764- can be modified.
 WARNING
Before starting work on electrical equipment and removing steering wheel, the following conditions must be fulfilled:
- Disconnect the battery ground cable. Refer to → Electrical Equipment; Rep. Gr.27; Battery; Battery, Disconnecting and Connecting.
- The wheels must be straight.
If these notes are not observed, the airbag system may not function properly during vehicle operation!
- Straighten the wheels.
- Pull lever downward beneath steering column.
- Push the steering column as far down as possible and remove it.
- Remove the steering wheel. Refer to → Chapter "Steering Wheel, Removing and Installing".
- Remove the footwell vent under the steering column Refer to → Heating, Ventilation and Air Conditioning; Rep. Gr.87; Air Routing; Front Passenger Side Footwell Vent, Removing and Installing.
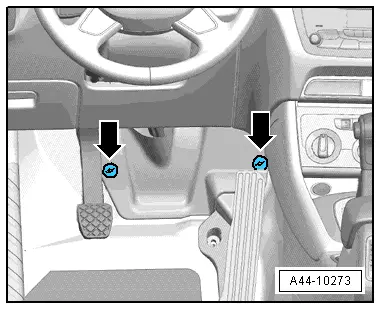
- Remove securing nuts -arrows- and remove foot well trim.
- Remove the steering column switch module. Refer to → Electrical Equipment; Rep. Gr.94; Steering Column Switch Module; Steering Column Switch Module, Removing and Installing.
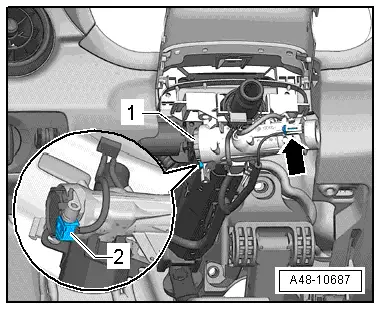
Vehicles with ignition switch
- Remove the connector -arrow- from the Anti-Theft Immobilizer Reader Coil -D2-.
- Remove the connector -2- from the ignition/starter switch -1-.
- Free up the wires.
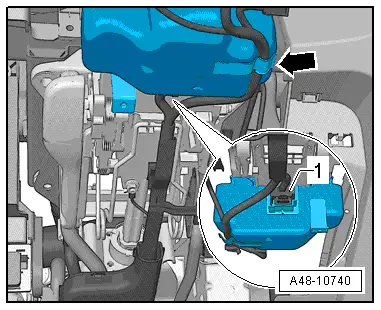
Vehicles with "Keyless Access Authorization System"
- Release the connector -1- and remove it from the Electronic Steering Column Lock Control Module -J764-.
- Free up the wire at the retaining bracket -arrow-.
Continuation for all
- Remove the clips -1, 3 and 4-.
- Remove the ground cable nut -2-.
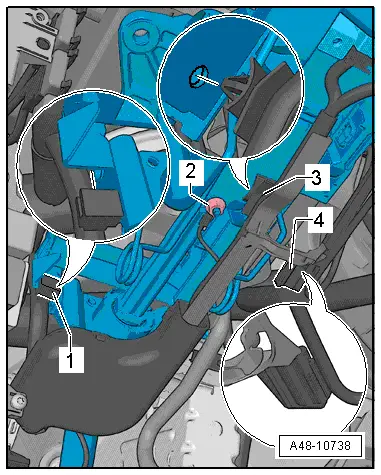
- Remove the wiring guide -1- under the steering column. To do this, lift the tab -arrow- slightly and remove the wiring guide from the guide on the steering column in the direction of the -arrow-.
- Free up the wiring harness for the steering column wiring.

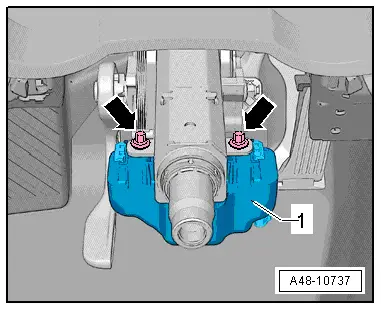
- Remove the bolt -arrow- and remove the universal joint -1- from the steering gear in the direction of the -arrow-.
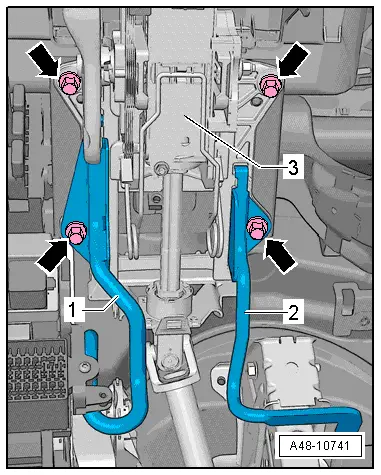
- Remove the bolts -arrows- (while supporting the steering column at the top with one hand) and if installed, remove the crash bolsters -1 and 2-.
- Lower the steering column -3- slightly and carefully pull it out upward.
 Caution
For correct handling and transport of steering column. Refer to → Chapter "Steering Column, Handling and Transporting".

Installing
Installation is reverse of removal, noting the following:
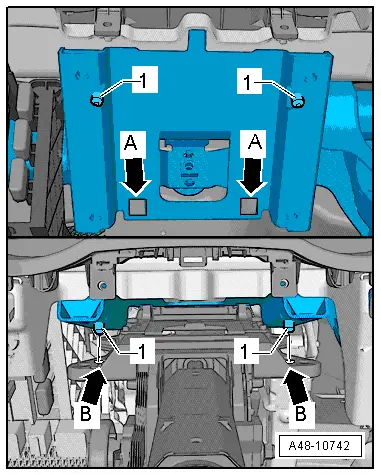
- Hook steering column into assembly aid on mounting bracket -arrows A-.
- Align steering column to mounting bracket and install.
- While doing so, pins -1- of mounting bracket and holes -arrows B- of steering column must be positioned together and inserted into one another.
- Only in this way is the correct installation position of steering column to mounting bracket guaranteed.
- Tighten the upper bolts -arrows- for the steering column -3-.
- If equipped, insert the crash bolsters -1 and 2- and tighten the lower bolts -arrows- of the steering column bolted connections.
- Clean the threaded hole (for example, using a thread tap) before installing the new bolt -arrow-.
 WARNING
Pull on the universal joint to make sure it is secure when the bolt -arrow- is installed. Then tighten the bolt -arrow-.
- After installing the steering column switch module, the Steering Angle Sensor -G85- must be calibrated by starting the respective program on the Vehicle Diagnosis Tester.

Electronic Steering Column Lock Control Module -J764-, Removing and Installing
Special tools and workshop equipment required
- Angle Hand Drill, commercially available
- 8.5 mm diameter Drill Bit, commercially available
Removing
If a control module is being replaced, then select the function "Replace" for the respective control module on the Vehicle Diagnosis Tester in the "Guided Functions".
Follow the instructions on the screen.
- Straighten the wheels.
- Pull the lever on the side of the steering column downward.
- Push the steering column as far down as possible and remove it.
- Push the lever on the side of the steering column upward again.
- Remove the steering wheel. Refer to → Chapter "Steering Wheel, Removing and Installing".
- Remove the driver side instrument panel cover. Refer to → Body Interior; Rep. Gr.68; Storage Compartments and Covers; Driver Side Instrument Panel Cover, Removing and Installing.
- Remove the Steering Column Electronics Control Module -J527-. Refer to → Electrical Equipment; Rep. Gr.94; Steering Column Switch Module; Overview - Steering Column Switch Module.
- Remove the steering column switch module. Refer to → Electrical Equipment; Rep. Gr.94; Steering Column Switch Module; Steering Column Switch Module, Removing and Installing.
 Caution
The shavings must not get into the steering column.
Protect the steering column from any falling shavings using, for example, a cloth.
- Drill out the shear bolts -arrows- using an angle hand drill and an 8.5 mm diameter drill bit.
- Remove any shavings with a brush.
- Disconnect the connector -1-, free up the wire on the retaining bracket -arrow- and carefully remove the Electronic Steering Column Lock Control Module -J764- from the steering column.
 WARNING
After removing the Electronic Steering Column Lock Control Module -J764-, make sure that no dirt or foreign objects enter the steering column.

Installing
Install in reverse order of removal. Note the following:
- Secure the Electronic Steering Column Lock Control Module -J764--1- with new shear bolts -arrows-.
- Tighten the shear bolts -arrows- evenly until the bolt heads shear off.
- Install the steering wheel. Refer to → Chapter "Steering Wheel, Removing and Installing".
- If the Electronic Steering Column Lock Control Module -J764- was replaced, then the Electronic Steering Column Lock Control Module -J764- must be adapted by selecting the function "Replace" on the Vehicle Diagnosis Tester in the "Guided Functions".
- Perform a basic setting on the Steering Angle Sensor -G85- using the Vehicle Diagnosis Tester.
- Follow the instructions on the screen.

READ NEXT:
 Steering Gear
Overview - Steering Gear
Part 1
1 - Bolt
6 Nm
For securing the wire
2 - Bolt
Tightening specification: -item 9-
Always replace if removed
Clean the threaded h
Wheel and Tire Guide
Audi Q3, Type 8U
This is the Wheel and Tire Guide for the Following Model:
"Audi Q3 / RS Q3".
Play Close Attention to the corresponding Notes and Cautions As Well As the
Comments in the Document.
Towing Guide
Towing Guide
Note
This is a "guide" for Audi models and their towing weights.
The proper towing weight of the respective vehicle must
always adhere to the corresponding vehicle documSEE MORE:
Legal information
General information
Information on the software licenses can be
found online at www.audi.com/softwareinfo.
Multi Media Interface
Applies to: MMI: Select on the home screen:
SETTINGS > General.
Legal notes
Possible options:
Software information
About Audi connect
Smartphone interface
Appli
Steering Wheel
Overview - Steering Wheel
1 - Steering Column Electronics Control Module -J527-
With Airbag Spiral Spring/Return Spring with Slip Ring -F138-
Removing and installing. Refer to
→ Electrical Equipment; Rep. Gr.94; Steering Column Switch Module;
Steering Column E