Audi Q3: System Overview - Refrigerant Circuit
HD = High-pressure end
ND = Low-pressure end
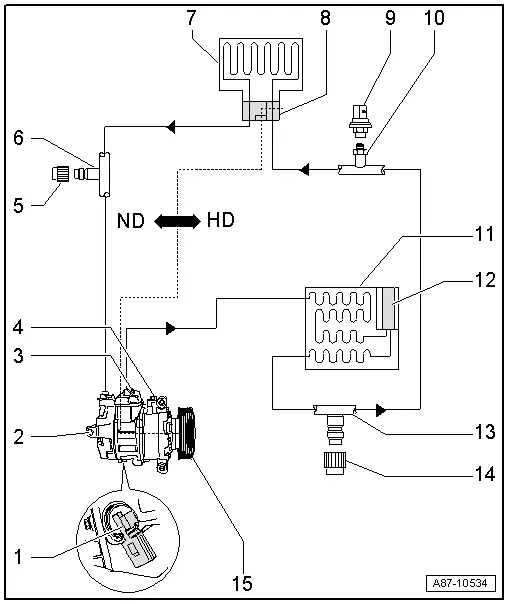
1 - A/C Compressor Regulator Valve -N280-
- To check, refer to Vehicle Diagnostic Tester in the "Guided Fault Finding" function, → Chapter "A/C Compressor Regulator Valve -N280-, Checking Switch-On Signal" and → Wiring diagrams, Troubleshooting & Component locations.
 Note
Note
- Certain functions on the A/C Compressor Regulator Valve -N280- (for example, a stuck valve or a disruption in the coil) can lead to a complaint regarding the A/C compressor (A/C system doesn't cool, the evaporator ices over, etc.). If the cause is with the A/C Compressor Regulator Valve -N280- (and not the A/C compressor itself), the A/C compressor can be serviced by replacing the A/C Compressor Regulator Valve -N280-. Refer to → Refrigerant R134a Servicing; Rep. Gr.87; Refrigerant Circuit Components, Replacing (Refrigerant R134a, Servicing; Refrigerant Circuit Components, Replacing).
- The A/C Compressor Regulator Valve -N280- is not available as a replacement part for all A/C compressors. If the A/C Compressor Regulator Valve -N280- is not available as an individual A/C compressor part (different versions), then the entire A/C compressor must be replaced. Refer to the Parts Catalog.
2 - A/C Compressor
- Overview. Refer to → Chapter "Overview - A/C Compressor Power Unit".
3 - Pressure Relief Valve
 Caution
Danger due to refrigerant coming out under pressure when there is a defective valve.
Danger of frost bite to skin and other parts of the body.
Only remove when the refrigerant circuit is empty. The connection does not have a valve.
4 - Oil Drain Plug
5 - Sealing Cap
- With seal
- Always to be screwed on
6 - Low Pressure Side Service Connection
- for measuring and emptying
 Caution
Danger due to refrigerant coming out under pressure when there is a defective valve in the refrigerant circuit.
Danger of frost bite to skin and other parts of the body.
Only remove when the refrigerant circuit is empty. The connection does not have a valve. Refer to → Refrigerant R134a Servicing; Rep. Gr.87; A/C System, General Information (Refrigerant R134a Servicing; A/C System, General Information).
7 - Evaporator
8 - Expansion Valve
- Overview. Refer to → Chapter "Overview - Condenser, A/C Compressor, Expansion Valve, Refrigerant Line".
9 - High Pressure Sensor -G65-
- To check, refer to Vehicle Diagnostic Tester in the "Guided Fault Finding" function, → Chapter "High Pressure Sensor -G65-, Checking Pressure Signal" and → Wiring diagrams, Troubleshooting & Component locations.
- Removing and installing. Refer to → Chapter "High Pressure Sensor -G65-, Removing and Installing".
10 - Connection with Valve
11 - Condenser
- Overview. Refer to → Chapter "Overview - Condenser, Dryer Cartridge".
12 - Receiver/Dryer
- The receiver/dryer is integrated in the condenser.
13 - High Pressure Side Service Connection
- for measuring, emptying and filling
 Caution
Danger due to refrigerant coming out under pressure when there is a defective valve in the refrigerant circuit.
Danger of frost bite to skin and other parts of the body.
Only remove when the refrigerant circuit is empty. The connection does not have a valve. Refer to → Refrigerant R134a Servicing; Rep. Gr.87; A/C System, General Information (Refrigerant R134a Servicing; A/C System, General Information).
14 - Sealing Cap
- With seal
- Always to be screwed on
15 - Belt Pulley
- Replace. Refer to → Chapter "Overview - Belt Pulley".
- Currently the belt pulley for the "Delphi" A/C compressors cannot be removed separately.
 Note
Note
The A/C compressor on vehicles with a 5-cylinder engine (Audi RS Q3) have two ribbed belts. The A/C compressor has a belt pulley with a double belt guide.
READ NEXT:
 Overview - Condenser
Overview - Condenser, Dryer Cartridge
Note
There are different versions of the condenser, radiator and
auxiliary radiator. Observe the correct allocation of these components.
Refer t
High Pressure Sensor -G65-, Removing and Installing
Note
When the High Pressure Sensor -G65- is removed, the cooling
output cannot be checked. The Climatronic Control Module
-J255-/A/C Control Module -J301- control head does not switch
Expansion Valve, Removing and Installing
Special tools and workshop equipment
required
Engine Bung Set -VAS6122-
Removing
- Remove the refrigerant pipes from the expansion valve. Refer
to
→ Chapter "Refrigerant LineSEE MORE:
Correct safety belt positioning
Fig. 58 Lap/shoulder belt positioning
Fig. 59 Safety belt positioning for pregnant women
Fastened safety belts only offer optimal protection
during an accident and reduce the risk of serious
injury or death when they are positioned
correctly. Furthermore, the correct safety belt
position holds the
Stabilizer Bar
Overview - Stabilizer Bar
1 - Subframe
2 - Bolt
25 Nm + 45º
Always replace if removed
Install evenly
3 - Clamp
4 - Bearing
Always replace the rubber mounts on both sides of vehicle
5 - Stabilizer Bar
Removing and installin