Audi Q3: Air Distribution Channels, Removing and Installing
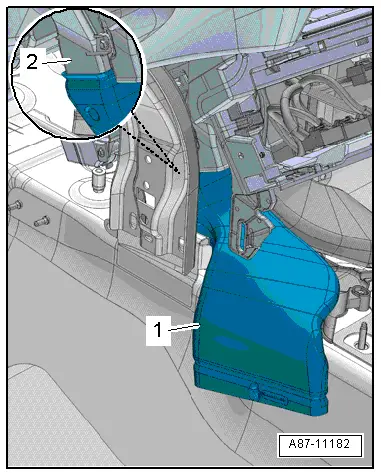
Center Instrument Panel Vent Air Guide, Removing and Installing
Removing
- Remove the instrument panel. Refer to → Body Interior; Rep. Gr.70; Instrument Panel; Instrument Panel, Removing and Installing.
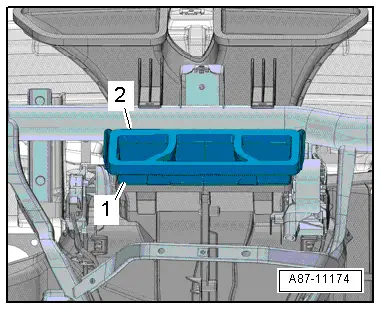
- Remove the center instrument panel vent air guide -1-.
Installing
Installation is done is reverse order, observe the following:
- Replace the damaged or defective foam seals -2-.
 Note
Note
- Do not press down the foam seal on the air guide while inserting it. This will cause the air guide to the instrument panel vents to be uneven or unsatisfactory.
- After installing the instrument panel, check the direction and distribution of the airflow coming out of the instrument panel vents.
- Make certain that the guides on the air guides are positioned correctly in the mounts.
- Install the instrument panel. Refer to → Body Interior; Rep. Gr.70; Instrument Panel; Instrument Panel, Removing and Installing.
Windshield, Defroster Vent Air Guide, Removing and Installing
Removing
- Remove the instrument panel. Refer to → Body Interior; Rep. Gr.70; Instrument Panel; Instrument Panel, Removing and Installing.
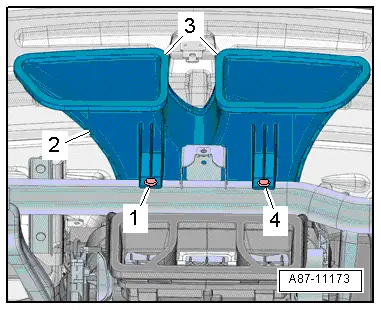
- Remove the expanding pins and remove the expanding clips -1 and 4-.
- Remove the air guide -2- upward.
Installing
Installation is done is reverse order, observe the following:
- Replace damaged or defective foam seals -3-.
 Note
Note
- Do not press down the foam seal on the air guide while inserting it. This will cause the air guide to the windshield to be uneven or unsatisfactory.
- After installing the instrument panel, check the direction and distribution of the airflow coming out of the defroster vent to the windshield.
- Install the instrument panel. Refer to → Body Interior; Rep. Gr.70; Instrument Panel; Instrument Panel, Removing and Installing.
Instrument Panel Vent Air Guide, Removing and Installing
Removing
- Remove the instrument panel. Refer to → Body Interior; Rep. Gr.70; Instrument Panel; Instrument Panel, Removing and Installing.
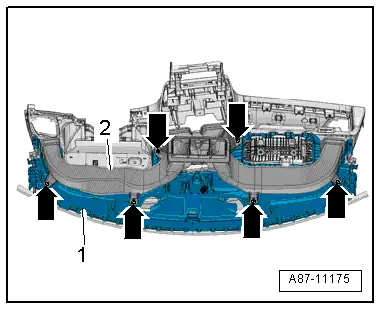
- Remove the bolts -arrows-.
- Remove the instrument panel vent air guide -2- from the instrument panel -1-.
Installing
Installation is done is reverse order, observe the following:
- Install the instrument panel. Refer to → Body Interior; Rep. Gr.70; Instrument Panel; Instrument Panel, Removing and Installing.
Air Guide for Glove Compartment Cooling, Removing and Installing
 Note
Note
Not planned for all vehicles; depending on vehicle equipment
Removing
- Remove the glove compartment. Refer to → Body Interior; Rep. Gr.68; Storage Compartments and Covers; Glove Compartment, Removing and Installing.
- Loosen the quick release -arrows- with a screwdriver.
- Remove the cover -1-.
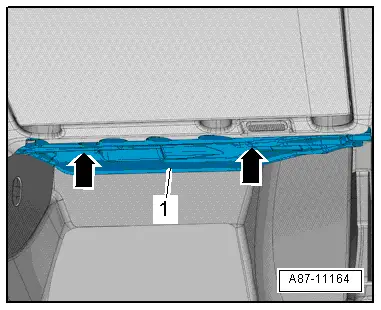
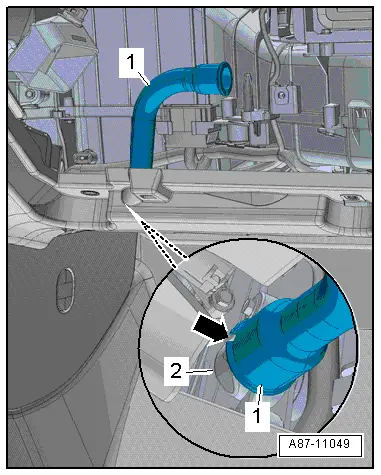
- Remove the air guide -1- from the A/C unit connection.
Installing
Installation is done is reverse order, observe the following:
 Note
Note
If the air guide hose is incorrectly slid onto the Air Conditioning (A/C) unit or glove compartment, noise can occur at the connection point.
- The air guide can only be slid all the way onto the connection -2- in one position.
- The tab -arrow- on the connection must engage into the guide.
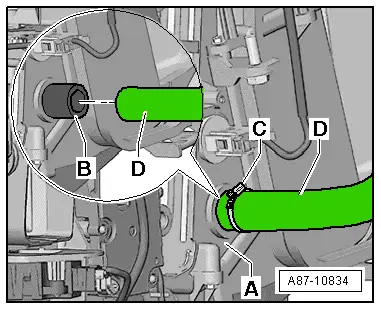
- If the air guide -D- is loose on the connection -B-, secure it with a hose clamp -C-. Hose clamps. Refer to the Parts Catalog.
- Install the footwell vent on the front passenger side. Refer to → Chapter "Front Passenger Side Footwell Vent, Removing and Installing".
Rear Air Guide Channel, Removing and Installing, Vehicles with Automatic Climate Control System
Removing
- Remove the front bracket for the center console. Refer to → Body Interior; Rep. Gr.68; Center Console; Center Console Bracket, Removing and Installing.
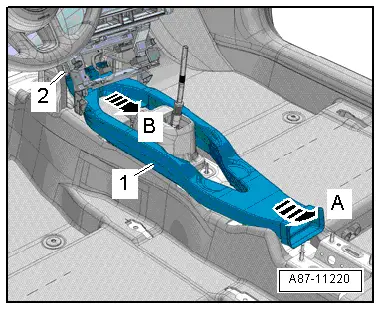
- Move the air guide channel -1- at the rear upward -arrow A- and pull it out of the retainer on the air distribution housing -2--arrow B-.
- Remove the rear air guide channel.
Installing
Installation is done is reverse order, observe the following:
- Install the front bracket for the center console. Refer to → Body Interior; Rep. Gr.68; Center Console; Center Console Bracket, Removing and Installing.
Air Guide Channel for Rear Footwell Vent, Removing and Installing
Removing
- Remove the carpet. Refer to → Body Interior; Rep. Gr.70; Passenger Compartment Trim; Carpet, Removing and Installing.
- Left and/or right rear footwell vents, removing and installing. Refer to → Chapter "Rear Footwell Vent, Removing and Installing".
- Pull out the air guide channel -1- from the A/C unit (the heater) -2- and remove.
Installing
Installation is done is reverse order, observe the following:
- Install the carpet. Refer to → Body Interior; Rep. Gr.70; Passenger Compartment Trim; Carpet, Removing and Installing.
Rear Vent Air Guide, Removing and Installing, Vehicles with Automatic Climate Control System
Removing
- Remove the center console rear trim. Refer to → Body Interior; Rep. Gr.68; Center Console; Center Console Rear Trim, Removing and Installing.
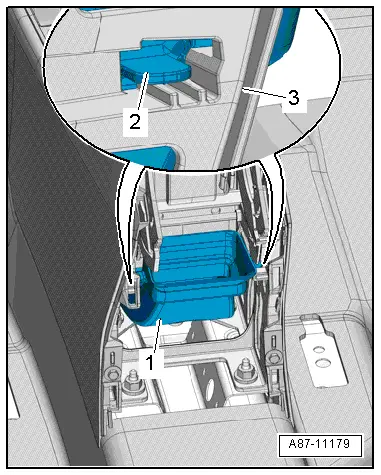
- Pull the air guide -1- upward far enough until the guides -2- are loosened from the mounts -3-.
- Remove the air guide to the rear.
Installing
Installation is done is reverse order, observe the following:
- Replace a damaged or defective foam seal on the air guide.
- Install the center console rear trim. Refer to → Body Interior; Rep. Gr.68; Center Console; Center Console Rear Trim, Removing and Installing.
