Audi Q3: Brake Caliper Piston, Removing and Installing
Brake Caliper Piston, Removing and Installing, Single-Piston Brake
Special tools and workshop equipment required
- Trim Removal Wedge -3409-
- Piston Resetting Tool -T10145-
- Piston Resetting Tool - Cap /6 -T10146/6- from Piston Resetting Tool - Caps /1,/2,/3,/4,/5 -T10146-
Removing
- The brake caliper is removed.
 Note
Note
- Install complete repair kit when servicing.
- To clean the brakes only use mineral spirits.
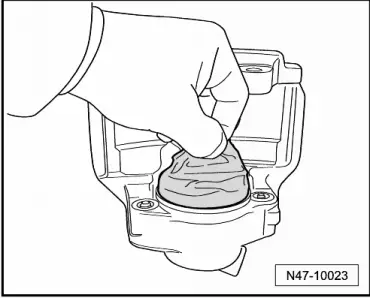
- Thinly coat the brake cylinder, piston and seal with Lithium Grease -G 052 150 A2-.
 Note
Note
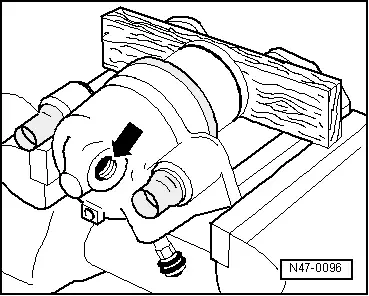
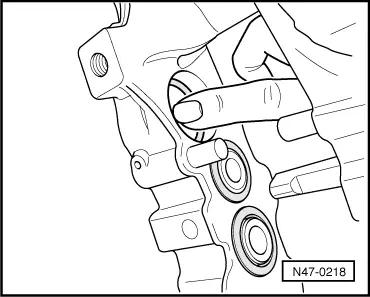
Place a wooden board into the recess of the caliper housing so it is not damaged.
- Push out the pistons from the brake caliper via the brake hose bore hole -arrow- using compressed air.
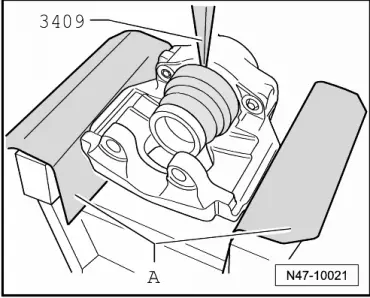
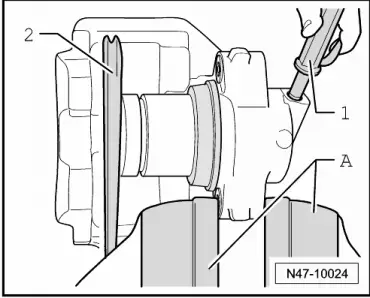
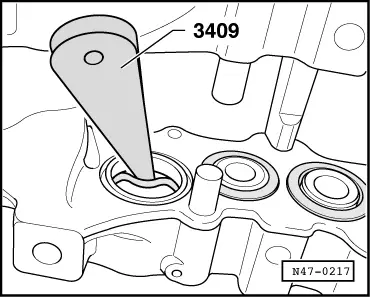
- Remove the protective cap from the brake caliper using the Trim Removal Wedge -3409-.
A - Vise protective jaws
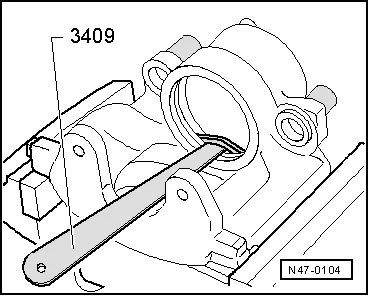
- Remove the sealing ring using the Trim Removal Wedge -3409-.
 Note
Note
When removing, make sure that surface of cylinder is not damaged.
Installing
- Clean the surfaces on the pistons and seal only with mineral spirits and then dry.
- Thinly coat the piston and the seal with Lithium Grease -G 052 150 A2- before installing.
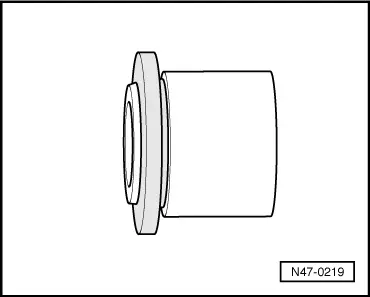
- Insert oil seal into brake caliper.
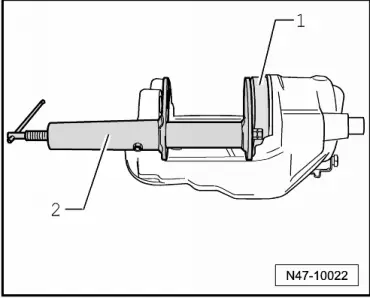
- Insert the protective cap -A- into the Piston Resetting Tool - Cap /6 -T10146/6--1-.

- Press the protective cap with the assembly tool -1- and the piston resetting tool -2- onto the brake caliper so that it contacts the brake caliper all around.
- Check seating of protective caps:
- Protective cap must no longer be able to be pulled from brake caliper by hand.
- Press the piston lightly on the protective cap and lock it in this position, for example using Trim Removal Wedge -3409--2-.
- Blow compressed air on the protective cap (maximum 3 bar (43 psi) ) -1-. Protective cap springs onto piston.
 Caution
Do not angle piston, to avoid damaging the seal sleeve.
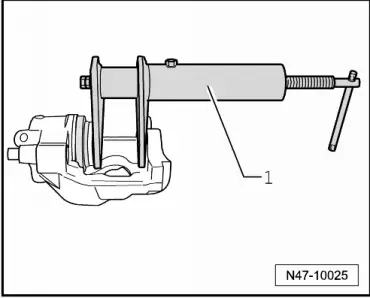
- Press the piston into the brake caliper using piston resetting tool -1-.
- Outer sealing lip of protective cap will then engage in piston groove.
Brake Caliper Piston, Removing and Installing, Eight-Piston Brake
Special tools and workshop equipment required
- Trim Removal Wedge -3409-
- Piston Resetting Tool -T10145-
- Protective eyewear
- Protective gloves
- Lithium grease, refer to the Parts Catalog.
Removing
- Remove brake pads, refer to → Chapter "Brake Pads, Removing and Installing, Brakes 1LA, 1ZT".
- Remove the brake caliper and disconnect from the hydraulic system, refer to → Chapter "Brake Caliper, Removing and Installing, 1LA, 1ZT Brakes".
 WARNING
Risk of injury.
- Wear protective eyewear.
- When removing the brake caliper piston, never touch the brake caliper chamber with fingers.
- Place a rag over the brake caliper chamber, to catch any brake fluid leaking out. Place an additional rag tightly around the compressed air gun nozzle on the brake caliper.
- To prevent skin contact with brake fluid, wear chemical resistant protective gloves.
 Note
Note
- When removing the brake caliper pistons and the protective cover pay attention that, the coating on the brake caliper is not damaged.
- Only one brake caliper piston can be pressed out at a time.
- Hold the opposing brake caliper piston in the brake caliper using the Piston Resetting Tool -T10145--a-.
- To prevent damage to the brake caliper paint coating, place a piece of rubber between the Piston Resetting Tool -T10145- and the brake caliper.
- Block the other pistons, for example, using wooden blocks -b-. Additionally, place a wooden board -c- in front of the Piston Resetting Tool -T10145- so that the brake caliper piston will be not be damaged when pressed out.
- Carefully remove the brake caliper piston with the seal from the brake caliper.

- Carefully remove the protective cap -1- with a screwdriver -2- with light hammering -arrow- from the brake caliper, while doing this do not damage the brake caliper coating.
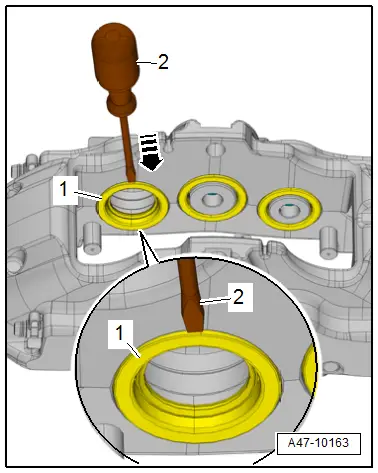
- Remove the sealing ring using the Trim Removal Wedge -3409-.
Installing
- Clean the surfaces on the pistons and seal only with mineral spirits and then dry.
 Note
Note
When a brake caliper piston or a piston cylinder are damaged, the brake caliper must be replaced.
- Thinly coat the brake caliper pistons and seals with lithium grease before installing, refer to the Parts Catalog.
- Insert oil seal into brake caliper.
- Install protective cap on brake caliper piston.
- Without tilting it, push the break caliper pistons using constant pressure.
- Press the protective covering into the groove on the brake caliper.
- The protective covering must fit tightly in the groove. If necessary, push down on it slightly with the Piston Resetting Tool -T10145-.
- Repeat the work procedure on the next brake caliper piston.
- Install the brake caliper, refer to → Chapter "Brake Caliper, Removing and Installing, 1LA, 1ZT Brakes".
- Install the brake pads, refer to → Chapter "Brake Pads, Removing and Installing, Brakes 1LA, 1ZT".
- Bleed the brake system, refer to → Chapter "Hydraulic System, Bleeding".

READ NEXT:
 Rear Brake Caliper
Overview - Rear Brake Caliper
1 - Brake Caliper
Pre-bleed brake caliper after repairing, refer to
→ Chapter "Hydraulic System, Pre-Bleeding".
2 - Bolt
35
Overview - Brake Booster/Master Brake Cylinder
Note
Brake master cylinder and brake boosters can be replaced
independently of one another.
1 - Heat Shield
2 - Nut
25 Nm
Always replace if removed
Sel
Brake Lamp Switch, Removing and Installing
Note
The Brake Lamp Switch -F-/Brake Pedal Switch -F63- is
installed in the brake master cylinder.
Removing
Audi RS Q3:
- Remove the air filter housing, refer to
→ Engine
SEE MORE:
Control Module and Hydraulic Unit
Overview - Control Module and Hydraulic Unit
1 - Brake Booster
Removing and installing, refer to
→ Chapter "Brake Booster, Removing and Installing".
2 - Brake Line
Master brake cylinder/primary piston circuit to hydraulic control
unit
Identification: 6.
Special Tools
Special tools and workshop equipment
required
Piston Resetting Tool -T10145-
Piston Resetting Tool - Cap /6 -T10146/6- from Piston
Resetting Tool - Caps /1,/2,/3,/4,/5 -T10146-
Brake Pressure Gauge -VAG1310A-
Brake Pedal Actuator -VAG1869/2-.
Brake Line Tool K
