Audi Q3: Brake Master Cylinder, Removing and Installing
Special tools and workshop equipment required
- Brake Charger/Bleeder Unit -VAS5234-
- Sealing plugs from Repair Kit -1H0 698 311 A-
Removing
- Remove the brake fluid reservoir, refer to → Chapter "Brake Fluid Reservoir, Removing and Installing".
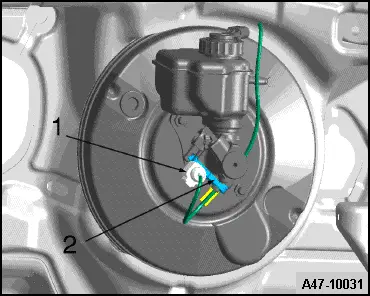
- Disconnect the connector -1- from the Brake Lamp Switch -F-/Brake Pedal Switch -F63-.
 Note
Note
Ignore item -2-.
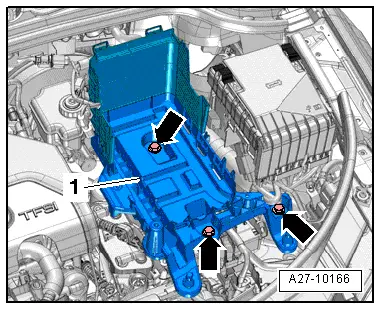
Audi RS Q3:
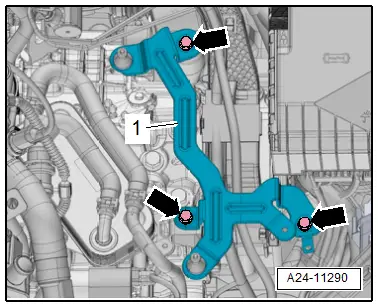
- Remove the bolts -arrows- and remove the bracket -1- for the air filter housing.
Continuation for All Vehicles:
- Open the bracket for the wiring guide -arrows- and push the wires aside.
- Remove the wiring guide.
- Extract as much brake fluid as possible from the brake fluid reservoir with the Brake Charger/Bleeder Unit -VAS5234-.
 Note
Note
To protect against escaping brake fluid, place enough lint-free cloths in the area below the master brake cylinder.
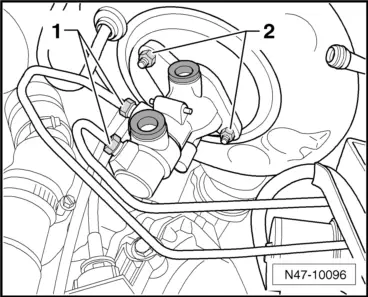
- Remove the union bolts -arrows- and remove the brake lines.
- Immediately seal off the brake lines and the threaded holes with the plugs from Repair Kit -1H0 698 311 A-.

- Remove the nuts -2-.
- If necessary, remove the heat shield with retaining plate.
- Remove brake master cylinder from brake booster.
 Note
Note
Ignore item -1-.
Installing
Install in reverse order of removal. Note the following:
 Note
Note
Replace the seal between the brake master cylinder and brake booster.
- When inserting the brake master cylinder, make sure the push rod is seated correctly in the brake booster.
- Press brake pedal down a bit, this allows the brake master cylinder to be guided into pressure rod more easily.
- Bleed the brake system, refer to → Chapter "Hydraulic System, Bleeding".
- Bleed the clutch mechanism, refer to → Rep. Gr.30; Clutch Mechanism; Clutch Mechanism, Bleeding.
 WARNING
Risk of accident!
Make sure the brakes are working correctly before driving the vehicle.
Brake Fluid Reservoir, Removing and Installing
Special tools and workshop equipment required
- Hose Clamps - Up To 25mm -3094-
- Brake Charger/Bleeder Unit -VAS5234- with Brake Bleeder Adapter -VAS5234/1-
Removing
- Extract as much brake fluid as possible from the brake fluid reservoir with the Brake Charger/Bleeder Unit -VAS5234-.
- To protect against escaping brake fluid, place enough lint-free cloths in the area below the master brake cylinder.
Audi Q3:
- Remove the battery and the battery tray, refer to → Electrical Equipment; Rep. Gr.27; Battery; Battery Tray, Removing and Installing.
 Note
Note
Place a cloth underneath to catch any brake fluid leaking out.
- For vehicles with a manual transmission, remove the return hose -1- to the clutch master cylinder.
- Release the left and right retainers -2- in direction of -arrow- and pull the brake fluid reservoir upward out of the sealing plugs.
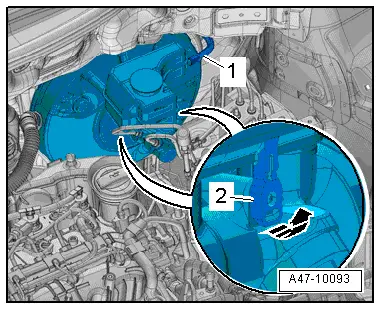
Audi RS Q3:
- Remove the air filter housing, refer to → Engine Mechanical, Fuel Injection and Ignition; Rep. Gr.24; Air Filter; Air Filter Housing, Removing and Installing.
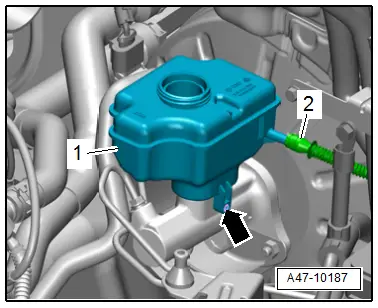
- Remove the stud bolt -arrow- and remove the brake fluid reservoir -1- upward from the sealing plugs.
 Note
Note
Ignore item -2-.
Installing
Install in reverse order of removal. Note the following:
- Bleed the brake system, refer to → Chapter "Hydraulic System, Bleeding".
 WARNING
Risk of accident!
Make sure the brakes are working correctly before driving the vehicle.
Tightening Specifications
- Air guide pipe, refer to → Rep. Gr.24; Air Filter; Overview - Air Filter Housing.
- Battery tray and battery, refer to → Electrical Equipment; Rep. Gr.27; Battery; Overview - Battery.
READ NEXT:
 Overview - Electric Vacuum Pump
1 - Brake System Vacuum Pump -V192-
Allocation, refer to the Parts Catalog.
Installed location: in the engine compartment over the engine
transmission separating point.
Do not di
Check Valve, Checking
Check valve is removed, refer to
→ Chapter "Check Valve, Removing and Installing".
Note
The check valve is installed directly in front of the vacuum
pump.
Valve must all
Vacuum Sensor -G608-, Removing and Installing
Removing
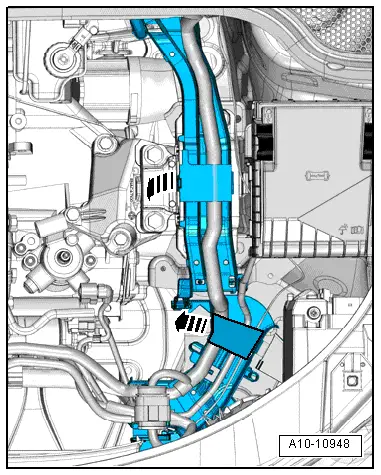
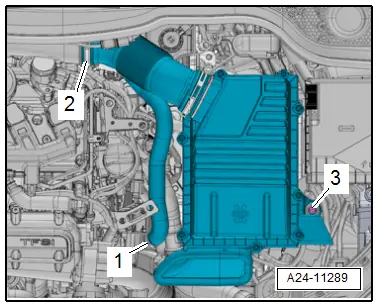
Audi Q3:
- Open the clamps -arrows- and
remove the air guide pipe -1-.
- Disconnect the connector -2-.
- Remove the vacuum hose -3-.
Audi RS Q3:
- Loosen the h
SEE MORE:
Front Brake Caliper Balance Weight
Depending on the model for each brake caliper two vibration
dampers are installed.
1 - Bolt
10 Nm
Replace after each removal.
2 - Vibration Damper
Installed 2 on each brake caliper
Removing and installing, refer to
→ Chapter "Damper, Removing and Inst
Visual Inspection
WARNING
Risk of injury. Follow all warning messages and
safety precautions. Refer to
→ Chapter "Warnings and Safety Precautions".
Before any extensive measurements are taken, visually
inspect the exterior of the battery, the connections, and the
secure installation of the
