Audi Q3: Vacuum Sensor -G608-, Removing and Installing
Removing
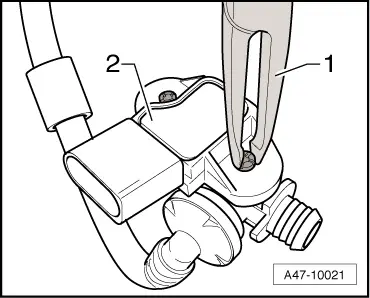
Audi Q3:
- Open the clamps -arrows- and remove the air guide pipe -1-.
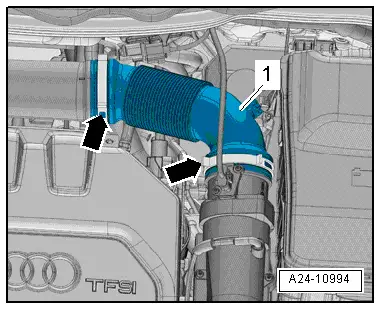
- Disconnect the connector -2-.
- Remove the vacuum hose -3-.
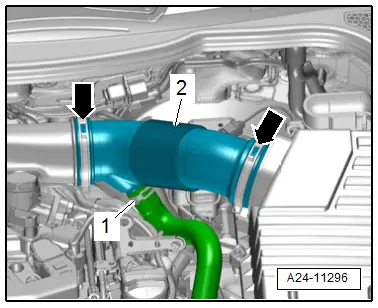
Audi RS Q3:
- Loosen the hose clamps -arrows- and move the air guide pipe with the hose connected to the side.
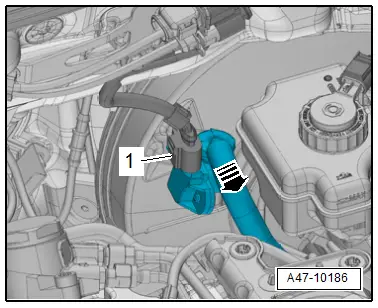
- Disconnect the connector -1-.
- Remove the vacuum hose from the brake booster in direction of -arrow-.
- Remove the vacuum line -1- from the vacuum pump and brake booster. Set it aside with the vacuum hose connected.
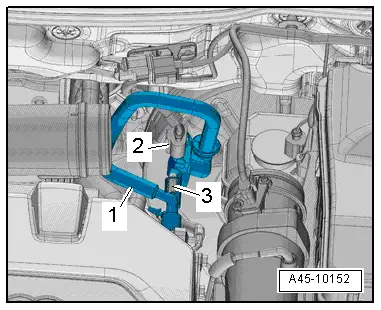
Continuation for All Vehicles:
- Release the retainers with pliers -1-.
- Carefully pry off the Vacuum Sensor -G608--2-.
Installing
Install in reverse order of removal.
Tightening Specifications
- Air guide pipe, refer to → Rep. Gr.24; Air Filter; Overview - Air Filter Housing.
Vacuum System, Checking
Tests and Test Requirements
The following checks will be helpful when performing Fault Finding if there are complaints regarding the brake booster or the so-called "hard brake pedal".
The following components are included in the check:
- Brake Booster
- Seal between the master brake cylinder and the brake booster
- Check valve
- Vacuum hoses and connectors
- Vacuum pump (if equipped)
Keep the geographical surrounding in mind when evaluating the measured results. The higher above sea level, the lower the air pressure.
Always observe all test requirements before checking the vacuum system:
- Check all the vacuum hoses for damage (for example, tears or damaged caused by animals) and make sure they are secure
- Maintain clean working conditions when working on the vacuum system
- Clean the engine compartment before starting, if necessary
Special tools and workshop equipment required
- Brake Servo Tester -VAS6721-
Brake Booster Tester, Connecting
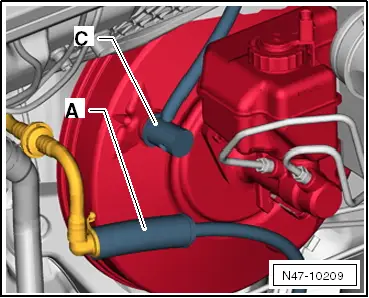
- Remove the vacuum hose from the brake booster.
- Pressing the brake pedal a few times beforehand makes it easier to remove the vacuum hose.
- Connect the Brake Servo Tester -VAS6721- as shown in the following illustrations.
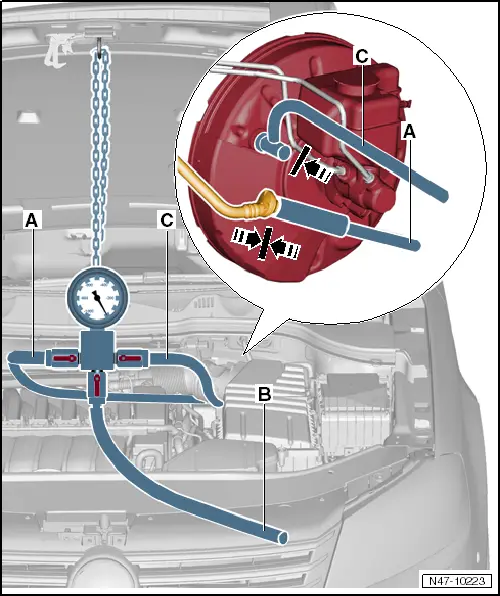
- Connect the Brake Servo Tester -VAS6721- hose -A- to the vacuum hose and push the adapter -C- into the brake booster.
Vacuum, Checking
 Note
Note
- The average earth atmospheric air pressure at sea level (N. N.) is 1013 mbar (14.69 psi) and it decreases dramatically at higher altitudes (approximately 100 mbar (1.4 psi) every 1000 meters higher) Local and time fluctuations will influence the vacuum.
- Idling the engine has a negative effect on creating a vacuum.
- Check all the vacuum hoses beforehand for damage (for example, tears or damaged caused by animals) and make sure they are secure
- Connect the Brake Servo Tester -VAS6721-, refer to → Chapter "Brake Booster Tester, Connecting".
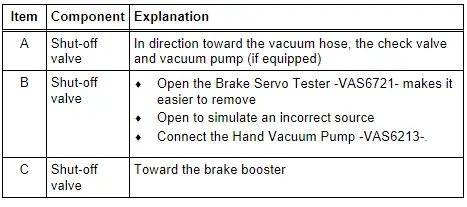
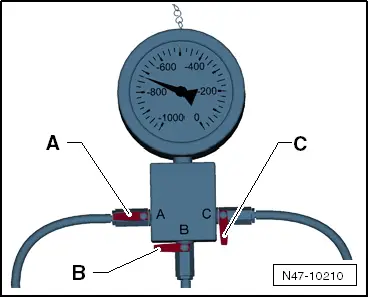
- Open the shut-off valve -A-.
- Close the shut-off valves -B + C-.
- Start the warm (above 60 ºC (140 ºF) ) engine and press the accelerator pedal one time quickly (engine RPM higher than 2,000).
- Read the measured value displayed.
Normally (see note) the vacuum should be between 600 and 950 mbar (8.7 and 13.7 psi) (depending on the engine installed).
Check the vacuum system for leaks if the measured value is not reached, even though all requirements (see notes).
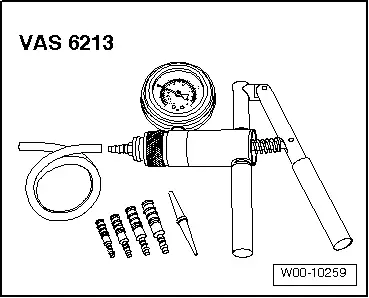
- Create the vacuum using a Hand Vacuum Pump -VAS6213- for comparison purposes, refer to → Chapter "Vacuum, Creating with Hand Vacuum Pump".
Opening the shut-off valve -B- makes it easier to remove the hose connections and the adapter.
Leak Test
 Note
Note
- The average earth atmospheric air pressure at sea level (N. N.) is 1013 mbar (14.69 psi) and it decreases dramatically at higher altitudes (approximately 100 mbar (1.4 psi) every 1000 meters higher) Local and time fluctuations will influence the vacuum.
- Idling the engine has a negative effect on creating a vacuum.
- Check all the vacuum hoses beforehand for damage (for example, tears or damaged caused by animals) and make sure they are secure
- Connect the Brake Servo Tester -VAS6721-, refer to → Chapter "Brake Booster Tester, Connecting".
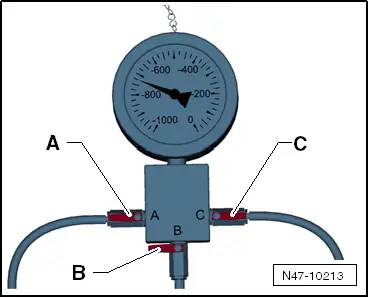
- Open the shut-off valve -A-.
- Close the shut-off valves -B+C-.
- Start the warm (above 60 ºC (140 ºF) ) engine and press the accelerator pedal one time quickly (engine RPM higher than 2,000).
- Normally (see note) the vacuum should be between 600 and 950 mbar (8.7 and 13.7 psi) (depending on the engine installed).

- Open the shut-off valve -C- and evacuate the brake booster.
- Turn off the engine.
- Read the measured value displayed and write it down.
- The vacuum may drop 400 mbar (5.8 psi) within 12 hours.
If the drop in vacuum is greater, check the....
1 - Brake Booster
or in the
2 - Check valve, vacuum hoses and connections and vacuum pump/intake manifold
for leaks.
The vacuum will drop considerably within a few seconds if there are large leaks.
Checking the Vacuum near the Brake Booster:
- Close the shut-off valve -A- after creating the vacuum to test the brake booster vacuum.
Vacuum Test Near the Check Valve, Vacuum Hoses and Connections and Vacuum Pump/Intake Manifold
- Close the shut-off valve -C- after creating the vacuum to check the vacuum system of the Brake Servo Tester -VAS 6721- up to the intake manifold or up to the vacuum pump.
Opening the shut-off valve -B- makes it easier to remove the hose connections and the adapter.

Vacuum, Creating with Hand Vacuum Pump
In certain situations, the vacuum can be created using a Hand Vacuum Pump -VAS6213- instead of using the engine or a vacuum pump.
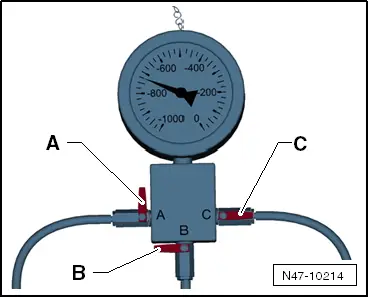
- To do this, connect the Hand Vacuum Pump -VAS6213- to the vacuum hose on the connection -B- on the Brake Servo Tester -VAS6721-.
- Open the shut-off valve -B-.
- Create the vacuum using the Hand Vacuum Pump -VAS6213- until a vacuum between 600 and 950 mbar (8.7 and 13.77 psi) on the Brake Servo Tester -VAS6721- is displayed.
- Perform the tests.
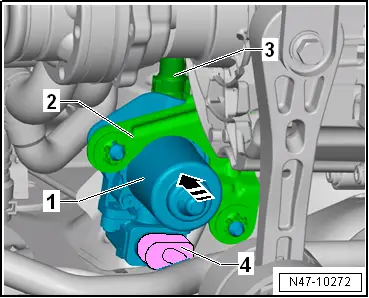
Electric Vacuum Pump, Removing and Installing
Removing
- Remove the noise insulation -1-, refer to → Body Exterior; Rep. Gr.66; Noise Insulation; Noise Insulation, Removing and Installing.
- Disconnect the connector -4-.
- Remove the vacuum line -3- from the electric vacuum pump -1-.
- Press the electric vacuum pump upward out of the bracket rubber buffers -2--arrow-.
Installing
Install in reverse order of removal. Note the following:
 Note
Note
If the electric vacuum pump is being replaced, modify the bracket for the vacuum pump.
READ NEXT:
 Vacuum Pump, Removing and Installing
Vacuum Pump, Removing and Installing, Vehicles with 2.0L TFSI Engine
Removing
- Remove the engine cover, refer to
→ Rep. Gr.10; Engine Cover; Engine Cover, Removing and
Installi
Brake Lines
Separating Points
Brake Line on the Underbody
1 - Brake line
2 - Brake hose
3 - Spring
4 - Brake hose bracket
Tightening Specifications
Refer to ite
Hydraulic System
Brake Fluid General Information
Brake fluid is hygroscopic, for example it has the ability
to absorb water and moisture from the air.
If water has been absorbed, the boiling point will drop, for
SEE MORE:
Overview - Electric Vacuum Pump
1 - Brake System Vacuum Pump -V192-
Allocation, refer to the Parts Catalog.
Installed location: in the engine compartment over the engine
transmission separating point.
Do not disassemble
Removing and installing, refer to
→ Chapter "Electric Vacuum Pump, Removing and
Overview - Hood
Overview - Hood
1 - Hood
A second technician is needed to support and hold the hood during
removal and installation.
Removing:
Unclip and remove the cover -4-.
Engage the gas-filled strut on the hood. Refer to
→ Chapter "Gas-Filled Strut, Removing and Installin
