Audi Q3: Hydraulic System
Brake Fluid General Information
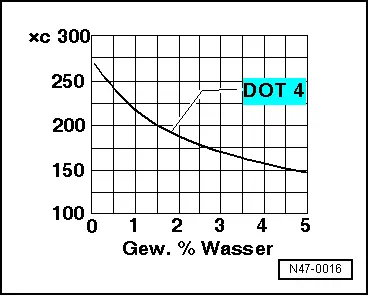
Brake fluid is hygroscopic, for example it has the ability to absorb water and moisture from the air.
If water has been absorbed, the boiling point will drop, for example, during high braking temperatures the brake fluid may develop steam bubbles and cause the brakes to fail.
Over time, brake fluid will darken in color. Dark-colored brake fluid does not specify anything about its quality. The color forms due to chemical reactions.
 WARNING
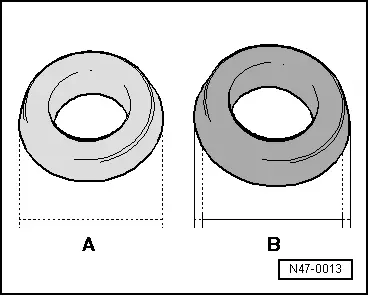
The rubber components of the brake system (boots, seals) do not tolerate mineral oil, gasoline, and cleaning agents!
Even the smallest amount on a seal or boot can cause the part to change and thereby affect the function of the brake system. The results of an unclean brake system first show themselves months later, causing increased repair costs, especially on vehicles with ABS.
A = Boot - Original size
B = Boot - Swollen through contact with mineral oil
It is implied by the previously mentioned points that:
- Keep containers of brake fluid closed securely. This is to make sure that no oil, dirt or cleaning materials and no humidity can enter the container.
- Store containers of brake fluid away from oil (even hydraulic oil) and cleaning fluids to prevent an accidental mixing of both fluids or even filling the brake system with the wrong fluid.
 WARNING
- Brake fluid must never come into contact with fluids containing mineral oils (oil, gas, cleaning solutions). Mineral oil damages the sealing plugs and boots of the brake system.
- Brake fluid is poisonous. NEVER siphon brake fluid with your mouth! Also due to its corrosive effect, brake fluid must not come into contact with paintwork.
- Brake fluid is hygroscopic, meaning that it absorbs moisture from the surrounding air, and must therefore be stored in air-tight containers.
- Follow all disposal regulations.
 Note
Note
- Use new brake fluid only.
- Wash off any spilled brake fluid with plenty of water.
Hydraulic System, Pre-Bleeding
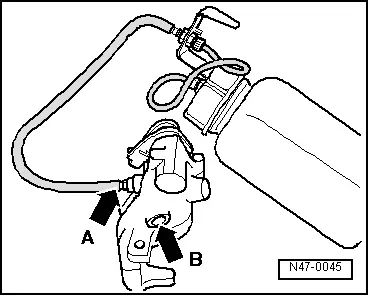
- Position brake caliper during pre-bleed procedure as shown in the illustration.
- Open the bleeder screw -arrow A- and using a commercially available bleeder bottle, fill with brake fluid until brake fluid with no bubbles flows from the threaded hole (brake hose connection) -arrow B-. Close the bleeder screw.
Hydraulic System, Bleeding
Brake System, Bleeding with Brake Charger/Bleeder Unit
Special tools and workshop equipment required
- Brake Charger/Bleeder Unit -VAS5234- with Brake Bleeder Adapter -VAS5234/1-
Procedure
- Connect the Brake Charger/Bleeder Unit -VAS5234- with Brake Bleeder Adapter -VAS5234/1-.
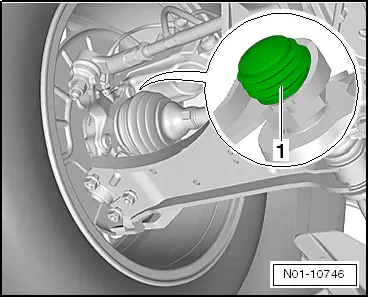
- Remove the cap -1- on each brake caliper bleeder screw and connect the container bleeder hose to the bleeder screw.
Bleeding Sequence
1 - Left front brake caliper
2 - Right front brake caliper
3 - Left rear brake caliper
4 - Right rear brake caliper
- Leave the bleeder screw open, with container hose connected, until brake fluid flows out clear and free of air bubbles.
- Press brake pedal 5 times to assist bleeding procedure.
- Tighten the bleeder screw, remove the bleeder hose and connect put the cap on the bleeder screw.
- Repeat the bleeding procedure in the specified sequence for the other brake calipers.
- Fill the brake fluid reservoir under consideration of brake pad wear up to the max marking and screw on the cap.
- Start the engine and check the brake pedal travel and pressure.
- If the pedal travel is too long, check the brake system for leaks and repeat the bleeding procedure, if necessary.
- After bleeding brake system, perform zero adjustment on Brake Pressure Sensor 1 -G201-, refer to Vehicle Diagnostic Tester.
A road test must be performed after bleeding. During this, at least one ABS regulation must be performed at all four wheels!
Changing the brake fluid.
 WARNING
Risk of accident!
Make sure the brakes are working correctly before driving the vehicle.

Brake System, Bleeding without Brake Charger/Bleeding Unit
Procedure
 Note
Note
Make sure that the brake fluid reservoir is always filled.
- Remove the cap -1- on each brake caliper bleeder screw and connect the container bleeder hose to the bleed screw.
Bleeding Sequence
1 - Left front brake caliper
2 - Right front brake caliper
3 - Left rear brake caliper
4 - Right rear brake caliper
- Build pressure up in brake system by pumping brake pedal.
 Note
Note
Slowly depress the brake pedal to prevent the formation of bubbles.
- As soon as pressure is built up, hold brake pedal in depressed position.
- Open the bleeder screw, with bleeder bottle hose connected, until the pressure is relieved (pedal drops).
- Hold pedal in completely depressed position and close the bleeder screw.
- Release brake pedal and wait approximately 2 seconds so that brake fluid can flow out of the brake fluid reservoir.
- Repeat the procedure until the brake fluid flows out clear and free of bubbles.
- Tighten the bleeder screw, remove the bleeder hose and connect put the cap on the bleeder screw.
- Repeat the bleeding procedure in the specified sequence for the other brake calipers.
- Fill the brake fluid reservoir under consideration of brake pad wear up to the max marking and screw on the fuel cap.
- Start the engine and check the brake pedal travel and pressure.
- If the pedal travel is too long, check the brake system for leaks and repeat the bleeding procedure, if necessary.
Changing the brake fluid.
 WARNING
Risk of accident!
Make sure the brakes are working correctly before driving the vehicle.
Checking for Leaks
Special tools and workshop equipment required
- Brake Pressure Gauge -VAG1310A-
- Brake Pedal Actuator -VAG1869/2-.
 Note
Note
Additional adapters may be needed in order to connect Brake Pressure Gauge -VAG1310A- to the caliper.
High Pressure Testing
- Brake system (brake master cylinder, brake hoses, brake lines and brake calipers) tested for function and leaks.
- Remove bleeder screw at one of the front brake calipers. Connect the Brake Pressure Gauge -VAG1310A- and bleed.
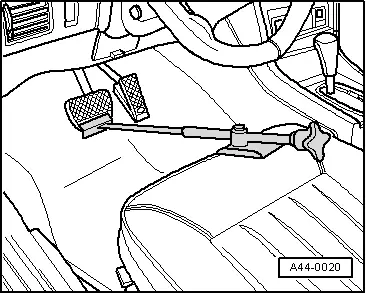
- Insert the Brake Pedal Actuator -VAG1869/2- between the brake pedal and driver seat. Apply pressure to brake pedal until the gauge indicates a pressure of 50 bar (725 psi). The pressure must not drop by more than 4 bar (58 psi) during the test period of 45 seconds.
Replace master cylinder if pressure drops greatly.
Low Pressure Testing
- Set the brake pedal actuator back far enough that the pressure gauge indicates 6 bar (87 psi) positive pressure.
- The pressure must not drop by more than 1.0 bar (14.5 psi) during a test period of 3 minutes.
Replace master cylinder if pressure drops greatly.
READ NEXT:
 Special Tools
Special tools and workshop equipment
required
Piston Resetting Tool -T10145-
Piston Resetting Tool - Cap /6 -T10146/6- from Piston
Resetting Tool - Caps /1,/2,/3,/4,/5 -T10146-
SEE MORE:
Climate control system
Description
One of the following options may be available,
depending on vehicle equipment:
A deluxe automatic climate control system with
two zones to individually adjust temperature and air distribution for the
left and right
front sides 1)
A deluxe automatic climate control system with
thr
Recirculation Door Motor -V113-, Removing and Installing
Recirculation Door Motor -V113-, Removing and Installing, Manual Climate
Control System (or Heater without A/C System)
Note
The color-coded connecting elements on the actuator for the
identification has been discontinued as a running change as of
10/2013 for those connecting elem
