Audi Q3: Heater and A/C Unit, Removing and Installing
Special tools and workshop equipment required
- Hose Clamps - Up To 25mm -3094-
- Engine Bung Set -VAS6122-
- Compressed air gun, commercially available
Removing
 WARNING
There is a risk of scalding from hot steam and coolant.
- The coolant system is under pressure when the engine is warm.
- To reduce the pressure, cover the coolant reservoir cap with several cloths and then open it carefully.
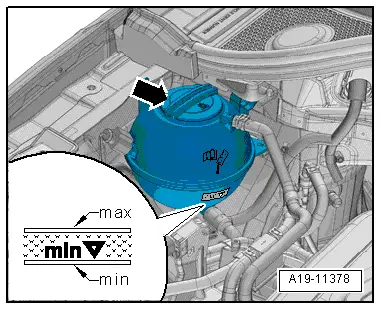
- Open the coolant reservoir cap -arrow-.
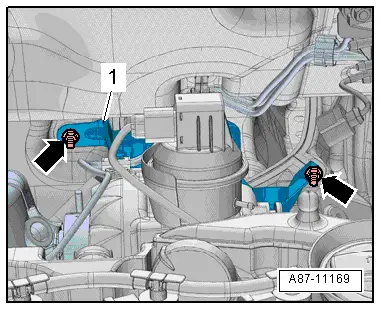
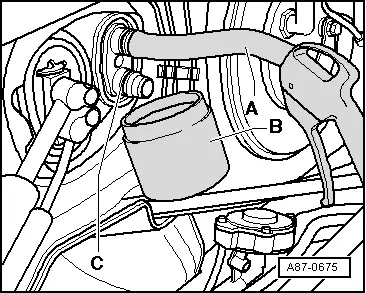
- If equipped, remove the nuts -arrows- and remove the heat shield -1-.
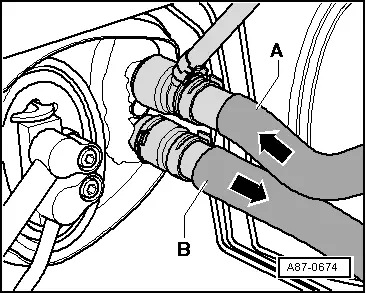
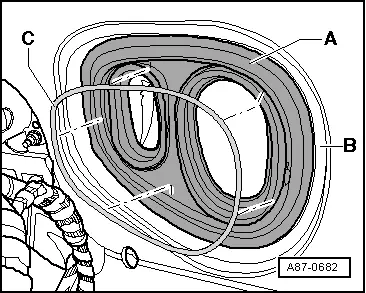
- Mark the layout of the coolant hoses -A and B-.
 Note
Note
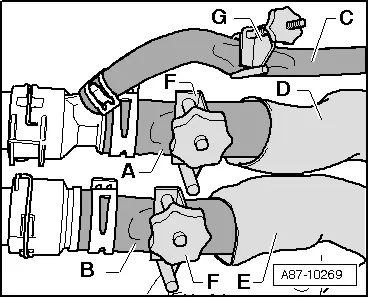
The heater core is designed for a specific coolant flow direction -arrows-. Therefore, coolant hoses must be connected on the correct sides.
- Vehicles with gasoline engine: Slide the heat insulation -D and E- slightly back and clamp off the coolant hose -C- with Hose Clamps - Up To 25mm -3094--G-.
- Clamp off the coolant hoses -A and B- with Hose Clamps - Up To 25mm -3094--F- and remove them from the heater core by lifting the clips.
- Slide a short hose -A- onto the upper connection.
- Insert the compressed air gun into the end of the hose.
- Hold a container -B- under the lower connection -C- and carefully blow the coolant out of the heater core using the compressed-air gun.
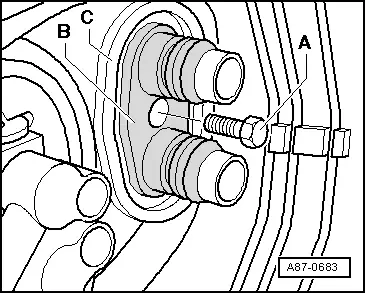
- Remove the bolt -A-.
- Remove the adapter -B- from the heater core connections.
- Seal the open lines and connections with clean plugs from the Engine Bung Set -VAS6122-.
- Discharge the refrigerant circuit. Refer to → Refrigerant R134a, Servicing; Rep. Gr.87; Refrigerant Circuit (Refrigerant R134a, Servicing; Refrigerant Circuit, Using Service Station).
- Remove the refrigerant pipes from the expansion valve. Refer to → Chapter "Refrigerant Lines, Disconnecting and Connecting at Expansion Valve".
- Remove the instrument panel. Refer to → Body Interior; Rep. Gr.70; Instrument Panel; Instrument Panel, Removing and Installing.
- Remove the windshield air guide and defroster vent. Refer to → Chapter "Windshield, Defroster Vent Air Guide, Removing and Installing".
- Remove the center instrument panel vent air guide. Refer to → Chapter "Center Instrument Panel Vent Air Guide, Removing and Installing".
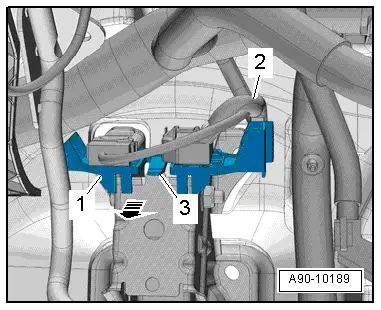
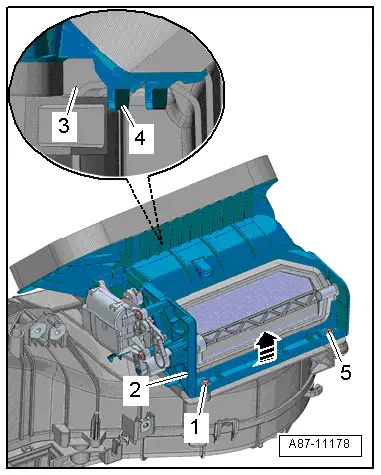
- Vehicles with Auxiliary Heater Heating Element -Z35-: Remove the nut -4- and remove the ground cable -1-.
- Release the tab -3- to disconnect the connector -2-.
- Remove the central tube. Refer to → Body Interior; Rep. Gr.70; Instrument Panel Central Tube; Instrument Panel Central Tube, Removing and Installing.

- Remove the data bus on board diagnostic interface. Refer to → Electrical Equipment; Rep. Gr.97; Control Modules; Data Bus On Board Diagnostic InterfaceJ533, Removing and Installing.
- Free up the wiring harness -2-.
- Release the tab -3- and remove the mount -1- from the pedal assembly -arrow-.
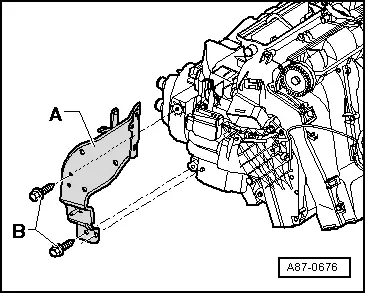
- Remove the bolts -B-.
- Move the bracket -A- with the cable channel to the side.
- If equipped, remove the Access/Start Authorization Control Module -J518-. Refer to → Electrical Equipment; Rep. Gr.94; Access/Start Authorization; Access/Start Authorization Control ModuleJ518, Removing and Installing.
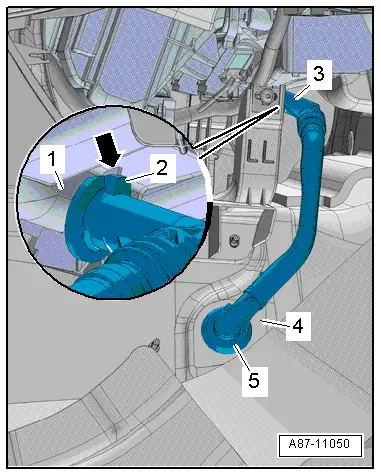
- Remove the bolts -A-.
- Move the bracket -B- with the cable channel to the side.
- Disconnect the connector -C-.
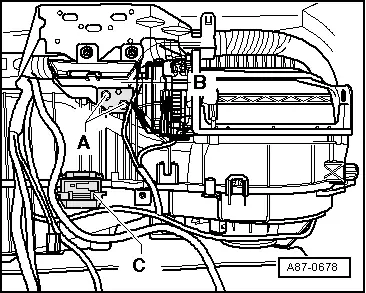
- Remove the condensation water drain hose -3- from the A/C unit connection -1-.
 Note
Note
Ignore items -2, 4, 5 and arrow-.
- Carefully pull the A/C unit (heater) -D- on the right side toward the rear a little.
- Remove the bolt -B- and push the bracket -A- with the wiring harness -C- to the side.
- Slightly lift the A/C unit (heater) at the rear and remove the air guide channel for the rear vent and rear footwell vent.
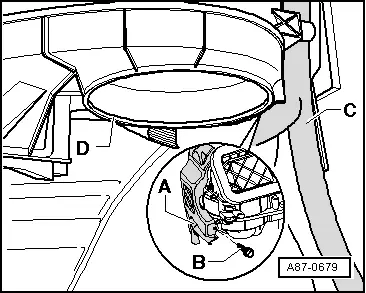
- Pull the A/C unit (heater) into the vehicle interior while guiding the coolant pipes -A- for the heater core and expansion valve -B- out of the grommet -C-.
 Note
Note
Make sure that the coolant pipes for the heater core do not get caught, bent or damaged on the plenum chamber hole or noise insulation mat.

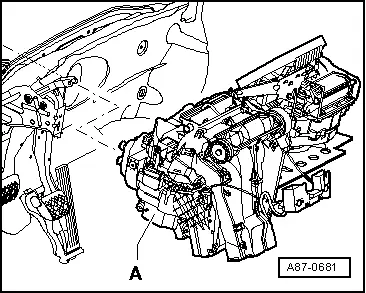
- Move the A/C unit (heater) -A- near the fresh air blower into the vehicle interior and remove it toward the right.
Installing
Installation is done is reverse order, observe the following:
 Note
Note
Before installing, check all seals on A/C unit (heater) for damage and replace if necessary.
- Check the grommet -A- on the bulkhead partition pass-through -B- for proper seating.
- Insert the support ring -C- into the grommet.
- The brace on the support ring must face outward.
- Coat the grommet with lubricant.
- Insert the A/C unit (heater) while a second technician guides out the coolant pipes -A- for the heater core and the expansion valve -B- at the grommet -C-.
 Note
Note
- Make sure the grommet sits correctly on the bulkhead partition.
- Damaged or incorrectly installed grommets will allow water to enter into the passenger compartment.
- Install the condensation water drain hose. Refer to → Chapter "Condensation Water Drain, Removing and Installing".
- Install the central tube. Refer to → Body Interior; Rep. Gr.70; Instrument Panel Central Tube; Instrument Panel Central Tube, Removing and Installing.
- Vehicles with Auxiliary Heater Heating Element -Z35-: Connect the wires to the Auxiliary Heater Heating Element -Z35-. Refer to → Chapter "Auxiliary Heater Heating Element -Z35-, Removing and Installing".
- Install the center instrument panel vent air guide. Refer to → Chapter "Center Instrument Panel Vent Air Guide, Removing and Installing".
- Install the windshield air guide and defroster vent. Refer to → Chapter "Windshield, Defroster Vent Air Guide, Removing and Installing".
- Install the instrument panel. Refer to → Body Interior; Rep. Gr.70; Instrument Panel; Instrument Panel, Removing and Installing.
- Connect the refrigerant lines to the expansion valve. Refer to → Chapter "Refrigerant Lines, Disconnecting and Connecting at Expansion Valve".
- Evacuate the refrigerant circuit and fill it. Refer to → Refrigerant R134a, Servicing; Rep. Gr.87; Refrigerant Circuit (Refrigerant R134a, Servicing; Refrigerant Circuit, Using Service Station).
- Add coolant and bleed according to specification. Refer to → Engine Mechanical, Fuel Injection and Ignition; Rep. Gr.19; Cooling System/Coolant; Coolant, Draining and Filling.
After completing the repair work, perform the following operations on the control head using the Vehicle Diagnostic Tester in the "Guided Fault Finding" function:
- Check the Diagnostic Trouble Code (DTC) memory and delete any currently displayed entries.
- Perform the basic setting.
- Perform output Diagnostic Test Mode (DTM).
- Operate the A/C system after filling the refrigerant circuit. Refer to → Chapter "A/C System, Starting Operation after Filling Refrigerant Circuit".
- Check the function of the A/C system, and the airflow direction and distribution of the air current coming out of the defroster to the windshield.
- Check the direction of the air flow depending on the switch position.

Heater and A/C Unit Air Intake Housing, Removing and Installing
Removing
- Remove the Air Conditioning (A/C) unit (heater). Refer to → Chapter "Heater and A/C Unit, Removing and Installing".
- Disconnect the connector from the actuator.
- Remove the bolts -1 and 5-.
- Fold the air intake duct -2- upward -arrow-. At the same time, the mounts -4- are disengaged at the guides -3- on the evaporator housing lower section.
- Remove the air intake duct.
Installing
Installation is done is reverse order, observe the following:
- Insert the air intake duct at the guides. At the same time, the guide must sit completely in the air guide housing.
 Note
Note
There are different versions for the manual climate control system (heater without A/C system) and for the automatic climate control system. Refer to the Parts Catalog.
- Install the A/C unit (heater). Refer to → Chapter "Heater and A/C Unit, Removing and Installing".
READ NEXT:
 Air Distribution Housing, Removing and Installing
Removing
- Remove the Air Conditioning (A/C) unit (heater). Refer to
→ Chapter "Heater and A/C Unit, Removing and Installing".
- Remove the bolts -arrows-.
- Remove the heate
Heater Core, Removing and Installing
Special tools and workshop equipment
required
Hose Clamps - Up To 25mm -3094-
Engine Bung Set -VAS6122-
Compressed air gun, commercially available
Note
Depending on the engine v
Condensation Water Drain, Checking
Procedure
- Remove the glove compartment. Refer to
→ Body Interior; Rep. Gr.68; Storage Compartments and Covers;
Glove Compartment, Removing and Installing.
- Remove t
SEE MORE:
Mechanically unlocking and locking the doors
All doors must be unlocked or locked separately
if the central locking system fails.
Fig. 22 Driver's door: door lock cylinder
Fig. 23 Door: mechanically locking
Applies to: vehicles with anti-theft alarm system:
After unlocking using the lock cylinder and opening
the driver's door, you must press
Infotainment System Display, Removing and Installing
Infotainment System Display, Removing and Installing
The Front Information Display Control Head -J685- (Display)
is located in the center of the instrument panel.
The display and display support are a single unit and are
removed together. After its removal the display is removed from
the dis
