Audi Q3: Overview - Front Brake Caliper
Audi Q3 (8U) 2011-2018 Service Manual / Chassis / Brake System / Hydraulic Components / Overview - Front Brake Caliper
Overview - Front Brake Caliper, Single-Piston Brake
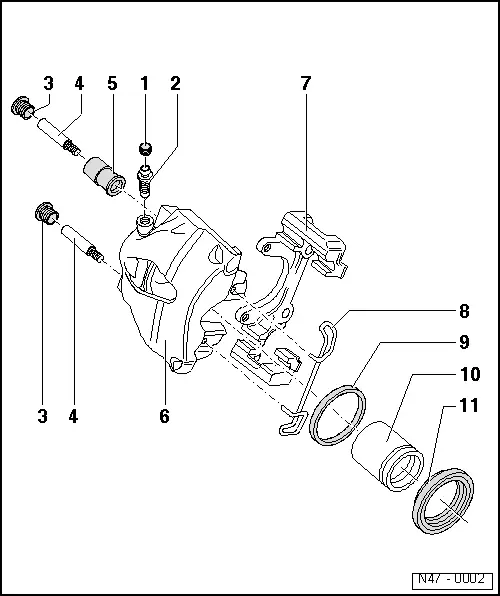
1 - Protective Cap
- Place on the bleed screw
2 - Bleeder Screw
- 10 Nm
- Before installing, lightly coat the thread with Lithium Grease -G 052 150 A2-.
3 - Caps
- Insert in bushing
4 - Guide Pin
- 30 Nm
5 - Bearing Bushing
- Insert in brake caliper
6 - Brake Caliper
7 - Brake Carrier
- Supplied as an assembled replacement part with sufficient grease on guide pins
- If the protective caps are damaged, install repair kit; use included grease packet to grease the guide pins.
8 - Spring
- Insert in both holes of brake caliper
9 - Seal
- Removing and installing, refer to → Chapter "Brake Caliper Piston, Removing and Installing".
- Do not damage when installing piston
10 - Piston
- Removing and installing, refer to → Chapter "Brake Caliper Piston, Removing and Installing".
- Thinly coat the piston with Lithium Grease -G 052 150 A2-
11 - Protective Cap
- Removing and installing, refer to → Chapter "Brake Caliper Piston, Removing and Installing".
- Pull onto piston with outer sealing lip
Overview - Front Brake Caliper, Eight-Piston Brake
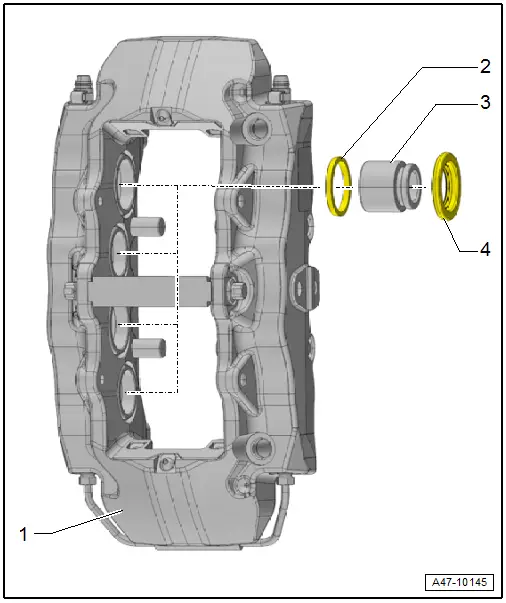
1 - Brake Caliper
2 - Seal
- Quantity: 8
3 - Brake Caliper Piston
- Quantity: 8
- Removing and installing, refer to → Chapter "Brake Caliper Piston, Removing and Installing, Eight-Piston Brake".
4 - Protective Cap
- Quantity: 8
- When damaged, install the complete repair kit, refer to the Parts Catalog.
READ NEXT:
 Brake Caliper Piston, Removing and Installing
Brake Caliper Piston, Removing and Installing, Single-Piston Brake
Special tools and workshop equipment
required
Trim Removal Wedge -3409-
Piston Resetting Tool -T10145-
Piston Resetting To
Rear Brake Caliper
Overview - Rear Brake Caliper
1 - Brake Caliper
Pre-bleed brake caliper after repairing, refer to
→ Chapter "Hydraulic System, Pre-Bleeding".
2 - Bolt
35
Overview - Brake Booster/Master Brake Cylinder
Note
Brake master cylinder and brake boosters can be replaced
independently of one another.
1 - Heat Shield
2 - Nut
25 Nm
Always replace if removed
Sel
SEE MORE:
Vehicles with a High Voltage System (Hybrid Vehicles)
Extremely Dangerous Due to High-Voltage
The high-voltage system is under high-voltage. Death or serious
bodily injury by electric shock.
- Individuals with electronic/medical life- and health sustaining
machines in or on their person cannot perform any work on high-voltage
systems. Life
Bulkhead
Overview - Bulkhead
1 - Gasket for Plenum Chamber
To remove, pull forward off the body flange.
Mount the seal on the foam piece -arrows-
and then push it onto the flange on the body.
Mount the seal on the opposite side on the foam piece and push it
onto the flange on the bod
© 2019-2025 Copyright www.auq3.net

