Audi Q3: Drive Axle, Disassembling and Assembling
Drive Axle, Disassembling and Assembling, Drive Axle with 100 mm Inner CV Joint
Special tools and workshop equipment required
- Tripod Joint Tool -T10065-
- Torque Wrench 1331 5-50Nm -VAG1331-
- Torque Wrench 1332 40-200Nm -VAG1332-
- Clamping Pliers -VAG1682A-
- Circlip Pliers -VW161A-
- Press Plate -VW401-
- Press Plate -VW402-
- Press Piece - Rod -VW408A-
- Press Piece - Rod -VW411-
- Press Piece - 37mm -VW416B-
- Press Piece - Multiple Use -VW447H-
CV Joint, Disassembling
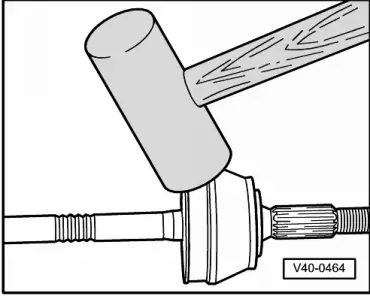
Removing the outer CV joint
- Remove the CV joint from the drive axle by hitting it with a light alloy hammer.
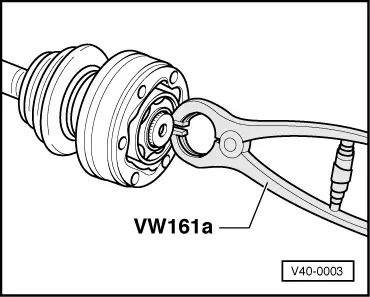
Circlip, removing and installing

Drive protective joint boot cap under with a brass or copper drift

Removing the inner CV joint
Assembling the CV joint

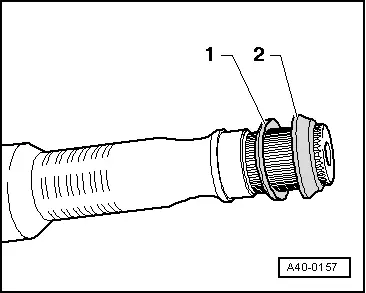
Installed location of spring washer and thrust washer on outer joint
1 - Plate Spring
2 - Thrust Ring
Outer CV Joint with Bolt, Installing
- Before installing joint piece, splines -A- must be lightly coated with grease used in joint.
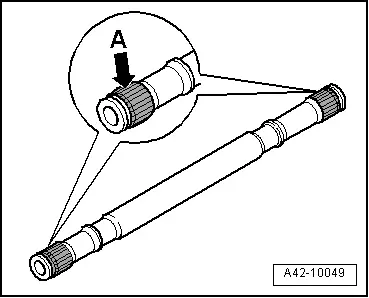
- Install the old bolt in the joint as shown in the illustration.
- Drive joint onto shaft with plastic hammer until circlip engages.

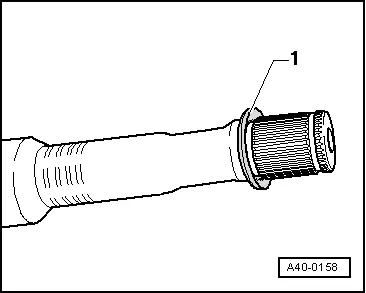
Installed location of the plate spring on inner joint
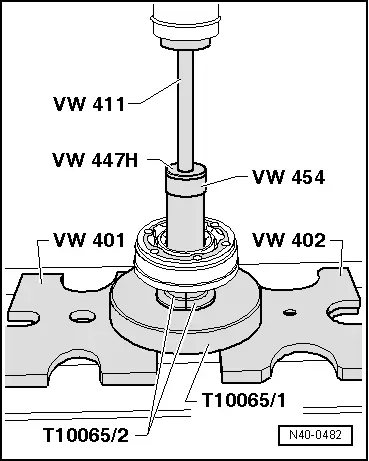
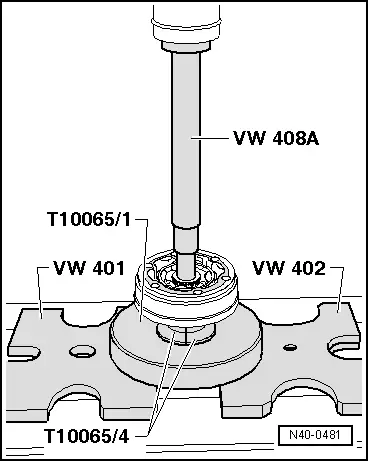
Pressing on Inner CV Joint
- Before installing joint piece, splines -A- must be lightly coated with grease used in joint.

- Install tools as shown in the illustration.
 Note
Note
Chamfer on inner diameter of ball hub (splines) must face the contact shoulder on the drive axle.
- Install circlip.
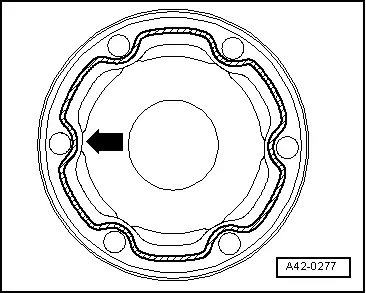
- Apply sealant -hatched surface- to clean surface on inner side of protective joint boot cap. Continuous sealant bead: Diameter 2 to 3 mm skirt area around inner holes -arrow-.
- Use sealant. Refer to the Parts Catalog.
- Slide the CV boot onto drive axle.
The drive axle, CV boot and cap contact surfaces must be free of grease.
Make sure you do not damage the sealant bead.
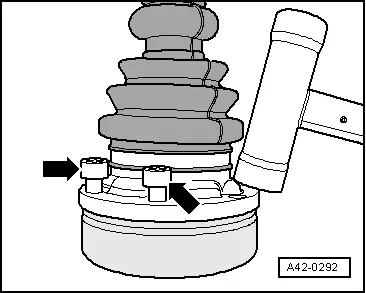
- Using screws -arrows-, align protective boot and cap with screw holes.
It must be aligned exactly because it cannot be aligned after driving on.
- Drive off the CV boot with cap using plastic hammer.
- Clear away leaking sealing immediately.
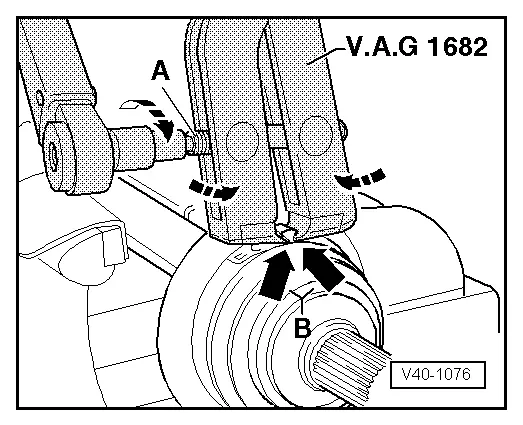
Stainless steel clamps for Hytrel protective joint boots, tensioning
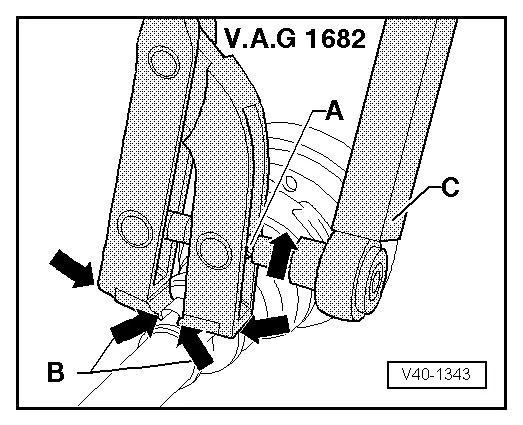
- Position pliers VAG1682 as shown in illustration. When doing this, make sure that edges of clamping pliers are seated in corners -arrows B- of clamp.
- Tighten the hose clamp by turning spindle -A- using a torque wrench (do not tilt clamping pliers).
- Tightening specification: 20 Nm
 Note
Note
- Make sure the threads on the spindle on the pliers move easily. Lubricate with MoS2 grease, if necessary.
- If the thread is tight, for example, dirty, the required tensioning force for the hose clamp will not be achieved in spite of correct torque specification settings.
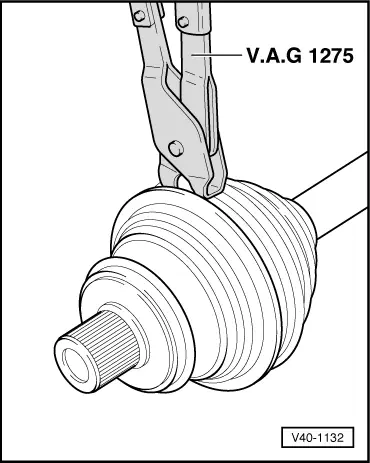
Clamps for rubber protective joint boots, tensioning
Drive Axle, Disassembling and Assembling, Drive Axle with 82 mm Outer CV Joint
Special tools and workshop equipment required
- Tripod Joint Tool -T10065-
- Torque Wrench 1331 5-50Nm -VAG1331-
- Torque Wrench 1332 40-200Nm -VAG1332-
- Clamping Pliers -VAG1682A-
- Circlip Pliers -VW161A-
- Press Plate -VW401-
- Press Plate -VW402-
- Press Piece - Rod -VW408A-
- Press Piece - Rod -VW411-
- Press Piece - 37mm -VW416B-
- Press Piece - Multiple Use -VW447H-
Disassembling
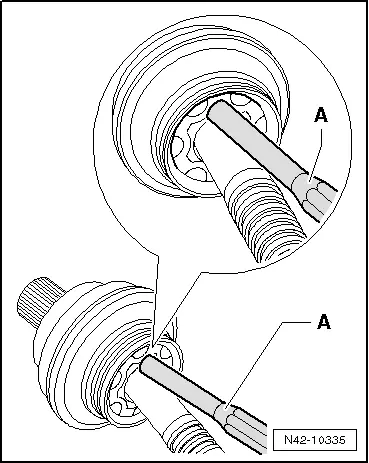
Outer CV joint, pressing off
- Clamp the drive axle with protective jaws in a vise clamp.
- Fold back boot.
- Drive CV joint from drive axle using a drift -A-.
The drift must be installed exactly on the CV joint ball hub.
Driving joint on
- Drive onto shaft with plastic hammer until the circlip engages.
Removing the inner CV joint
- Press off the CV boot from joint using drift.
- Remove the circlip.
- Remove both clamps, and push the CV boot toward outer joint.
Assembling
Dished washer installation position, inner and outer joint
1 - Plate Spring
- Press on joint until stop.
- Install the circlip.

Pressing on inner CV joint
 Note
Note
Chamfer on inner diameter of ball hub (splines) must face the contact shoulder on the drive axle.

Tightening clamping sleeve on outer joint
- Attach the Clamping Pliers -VAG1682A- as illustrated. When doing this, make sure that edges of clamping pliers are seated in corners -arrows B- of clamp.
- Tension clamp by turning spindle with a torque wrench (do not tilt clamp tool).
 Note
Note
- The hard material of the CV boot (compared to rubber) makes it necessary to use a stainless steel hose clamp. It is only possible to tighten the hose clamp with Clamping Pliers -VAG1682A-.
- Tightening specification: 25 Nm.
- Use torque wrench -C- with adjustment range 5...50 Nm (for example Torque Wrench 1331 5-50Nm -VAG1331-).
- Make sure the threads on the spindle -A- on the pliers move easily. Lubricate with MOS 2 grease, if necessary.
- If the thread is tight, for example, dirty, the required tensioning force for the hose clamp will not be achieved in spite of correct torque specification settings.

Tensioning clamp on small diameter
READ NEXT:
 Drive Axle Threaded Connection, Loosening and Tightening
Special tools and workshop equipment
required
Socket AF 24 mm -T10361A-
Digital Torque Wrench -VAG1756A-
The wheel bearing must not be under a load while the
driveshaft threaded connectio
Special Tools
Special tools and workshop equipment
required
Shock Absorber Set -T10001-
Tensioning Strap -T10038-
Tripod Joint Tool -T10065-
Locating Pins -T10096-
Engine/Gearbox Jac
SEE MORE:
Overview - Subframe
Caution
There is a risk of damaging the subframe threaded
connection threads on the body.
The subframe bolts on the body must not be loosened
or tightened with an impact wrench.
Always install all bolts by hand for the first few
turns.
1 - Subframe
Securing.
Roof Bars/Roof Rails
Overview - Roof Railing
1 - Nut
Quantity: 4
Install with locking compound. For the correct locking compound,
refer to the Parts Catalog.
Tightening sequence. Refer to
→ Fig. "Roof Rail - Tightening Specification and Sequence"
2 - Balancing Element
Quan
